Making HDR Photos with Luminance HDR
This article describes how to create high dynamic range (HDR) photos from a set of photos of a scene taken with different exposures, and shows that it is possible to obtain very good results even with a simple consumer point-and-shoot camera or smartphone. I first got into the whole concept of HDR photography when I figured out that my relatively cheap and simple compact Panasonic DMC-FX37 had an exposure bracketing mode. This means it takes three successive photos, one at normal exposure, one at a configurable exposure offset lower and one higher. While trying this out, I figured it should be possible to do more with the bracketed images than merely picking the best one out of the three. When I discovered Luminance HDR, I became very glad that this simple camera had that pretty advanced feature.
(I re-rendered this HDR in July 2024.)
I will first explain the whole idea behind HDR photography. Next, I will describe how I use Luminance HDR (and some external editing tools) to produce very good-looking HDR photos.
Exposure and Dynamic Range
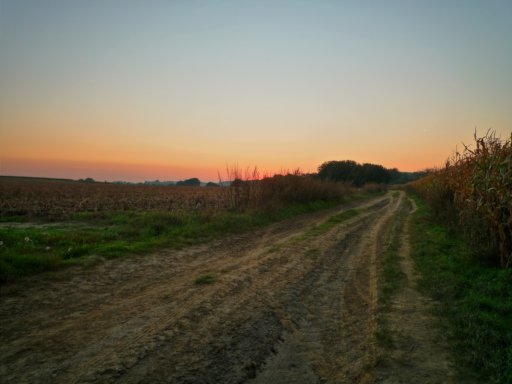
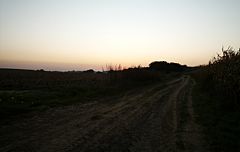
When one takes a photo with a bog standard digital camera in automatic mode, it will try to set the exposure such that on average, the scene as a whole is exposed properly. This mostly boils down to estimating the brightness (luminance) measured by every pixel on the image sensor, and adjusting the exposure such that the average value of all pixels falls in the middle of the brightness range that can be represented. Or in summary, the camera will simply try to make the photo look neither under- nor over-exposed.
For normal scenes like the one in the above photo, this works well because the sensitivity range of the camera's CCD or CMOS sensor is able to capture the relevant dynamic range of such scenes. To avoid exceeding this range, there are the usual golden rules of photography like ensuring that bright light sources (e.g., the sun) are never directly in front of the photographer. In cases where there are too extreme intensity differences, it may be possible to reduce the dynamic range by employing additional lighting (most often, by using a flash) to brighten up the underexposed objects in the scene. One might also use a graduated filter to darken the sky relative to the rest of the scene. Of course, these are hacks that alter the appearance of the scene. What if using a flash is impossible or we want to capture a scene with a very large dynamic range without altering it?
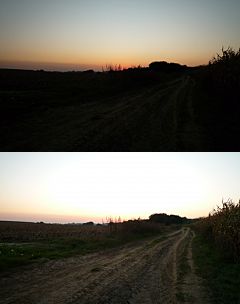
When photographing a scene with a dynamic range that exceeds what the sensor can capture, it is inevitable that parts in the photo will be either underexposed (too dark), overexposed (too bright), or both. The photos at the right show a typical example: it is impossible to simultaneously capture the colours in the sky of this sundown and the details on the ground, because this photo was taken right into the direction where the sun went down just a minute earlier. Therefore if we adjust the exposure to capture the sky, the much darker ground becomes a black blob, and if we try to properly expose the ground, the sky becomes a washed-out white. If we simply let the camera do its thing, the automatic exposure will make something in between, with both the sky washed out and the ground too dark. My first ever attempt at combining the best of the under- and overexposed photos was to simply cut the sky out of the underexposed photo and paste it into the overexposed photo. This looked vaguely OK, but it did not feel right and is highly unpractical, even when the under- and overexposed parts are not too intermingled.
The proper way to combine the information from both the under- and overexposed photos would be to decide for each pixel in which of the two photos it is represented the best, and then collect those pixels with proper intensity scaling into a single high-dynamic-range photo. This can be extended to any number of photos, the only requirement is that the exposure value (EV) for each photo must be known. If a pixel is properly exposed in multiple photos, an average can be taken to obtain an even better result. There has been a lot of research in ways to do this kind of combining and weighting and this has resulted in an open-source project that offers many of the resulting algorithms in a relatively easy-to-use interface. The project originally had the awkward name “Qtpfsgui” but was later renamed to Luminance HDR.
Luminance HDR
I will not go into all the details here on how to use Luminance HDR. The interface is in a state of constant improvement, therefore any detailed description would become outdated quickly. I will stick to general principles. You should easily find many tutorials on the web for specific instructions on how to use the interface of a particular release. Even without a tutorial I find the interface quite self-explanatory in itself.
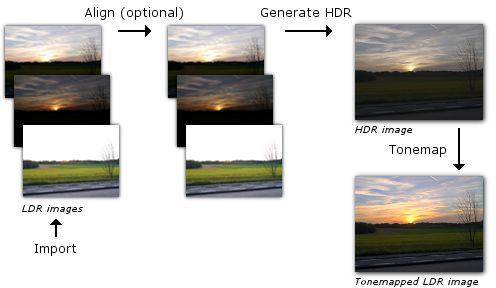
Luminance HDR offers a pipeline of operations that turns a set of photos with different exposures into a HDR image. This image can optionally be ‘tonemapped’ into a classic low-dynamic-range format like JPEG. The steps in this pipeline are the following:
- Collect the multiple-exposure photos.
- Align the photos such that they match pixel-by-pixel (in case the camera was moved between photos).
- Combine the photos into a single HDR image.
- Tonemap the HDR photo into a low-dynamic-range format.
The first two steps are easy, especially when the photos were taken with a tripod, avoiding any need to align them. The catch with Luminance HDR as compared to most other HDR tools, is that it offers way more freedom in the two last steps. Those steps are not exact science and there is a multitude of ways in which they can be performed. Luminance HDR does not restrict the user to one particular method or tries to automate the whole process with the risk of making wrong choices. This makes it a powerful tool for people who have an idea of how each method works, but it can make the program look daunting to those who quickly want to get results without having to know what's under the hood. If you follow my workflow as explained further on however, you should get good results without having to delve too deep into all the possibilities of Luminance HDR.
What is Tonemapping?
Tonemapping is the operation of mapping a HDR photo to a reduced dynamic range in such a way that it can be displayed on a low-dynamic-range device like a computer screen or photo paper, while still giving a sensation similar to the original high-dynamic-range scene. In a certain sense, squeezing the large dynamic range photo into a low-dynamic-range medium is similar to applying dynamic range compression on a sound recording. When done right, the recording still gives a very good impression of the live act. When done wrong (as is often the case nowadays), the recording is a poor shadow of the original. The same applies to tonemapping: it will only preserve the impression of the scene that was photographed if done right.
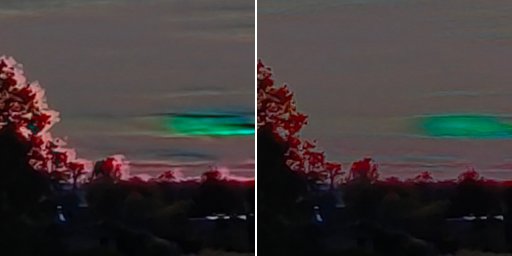
It may seem trivial: just rescale the intensity values in the HDR image to the smaller LDR range. Unfortunately that does not work. An example is shown at the right: although it does contain the full range of intensities from the two previous images, the sky is still too bright and the ground too dark. Any attempt to correct this by tweaking gamma curves will cause the colours to become dull and washed out, and parts will still look under- or over-exposed. This is perfectly normal given the knowledge of how the human eye perceives colour, but I won't go into detail about that here. The bottom line is that something special must be done to map the full range of intensities to a smaller range without losing the overall impression of the original scene.
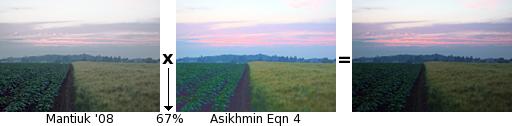
There has been quite a bit of research on this ‘something special’. This has resulted in a plethora of quite different tonemapping methods. Luminance HDR offers implementations of many of those methods with names like Mantiuk, Fattal, Drago, and Asikhmin. Each method seems to try to optimise a specific aspect but the only way to figure out what it really does, is to read its scientific paper or experiment with it. The series of thumbnails below show an overview of what each method produces with standard settings: as you can see the results vary wildly. My overall conclusion is that none of these methods work perfectly on their own, but very good results can be obtained by mixing their outputs, as shown in the image below the thumbnails. The next section explains how I usually arrive at this kind of result.
My Workflow
Take photos → (Preprocess →) Create HDR → Tonemap → Post-process
Taking the Photos
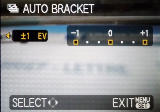
Having a camera that can do automatic bracketing is not essential if you want to make HDR photos, but will make it much easier and reduce problems with the scene changing in between the shots. The bracketing mode on my DMC-FX37 could take three photos within about one second in normal lighting conditions. More advanced cameras are able to take five or even seven photos and do it faster as well. I normally use a step size of 1 EV.
Of course you can also manually take photos with differing EV values, but it will be much slower and if anything in your scene is moving, the differences between the photos may be large. On the DMC-FX37 I could get a larger range than the ±1 EV it offered, by taking two sets of bracketed shots at a different base EV value. This gave me a whopping total range from -3 EV to +3 EV which is overkill in most situations. My OM-5 takes this to an even higher level: it can go up to ±6 EV, I don't think I will ever need this, but who knows.
If you can fix the aperture of your lens while taking a set of bracketed photos, do it. If you do not impose this constraint, your camera will likely take photos at different apertures to obtain the different EVs, and this could cause slight or even major differences between the photos. If varying exposure time leads to too long shutter times, an alternative is to bracket ISO values, but this could boost noise in the brighter frames.
If you are using an Android smartphone, I can recommend Open Camera to take photos with exposure bracketing (“EXPO {}” icon). Make sure to enable the Camera2 API if possible: it can take the multiple exposure shots with a much smaller delay.
Using more photos may help to reduce noise, however it also increases the risk of artefacts caused by small differences between photos. If two photos look very similar despite their different exposures, there is little point in using them both. I generally use all photos, but sometimes it helps to drop some of them to reduce artefacts.
Thanks to Luminance HDR's automatic alignment, it is not essential to ensure your camera is perfectly steady while taking the different exposures. Nevertheless, avoiding movement, for instance by using a tripod, will allow to skip the often slow and sometimes error-prone alignment procedure. Especially if you made any movements besides pure panning, there may be parallax errors between the photos which the alignment procedure cannot compensate for. On recent cameras with electronic shutter (including smartphones), the delay between shots is small enough that movement between images is usually limited to some minor panning across a few pixels per image. This can be manually corrected, avoiding the risk of automatic alignment failing and producing a mess.
Preprocessing

This step is optional and intended to avoid problems due to noise and non-linearity of the image sensor's response. In other words, for a high-end camera it may never be necessary at all. For a cheap camera with a small noisy sensor however (like my Panasonic DMC-FX37) the step is often required. Improvements in highlight handling committed to Luminance HDR after version 2.6.0 have greatly reduced the need for this kind of preprocessing, but it may still be needed in extreme cases.
Without this preprocessing step, ugly artefacts may end up in the HDR result. These artefacts manifest themselves as coloured noise, stains in dark areas or halos around light sources. With simpler cameras like the FX37, the problem might be that the sensor is noisy and deviates from a perfect linear response for the lowest and highest intensities. Because the photos are saved in JPEG format, compression artefacts may also introduce noise in regions that should have been clipped to perfect darkness or brightness. When the HDR algorithms try to tie those distorted responses together, they often end up with a distorted overall curve. The solution is to clip the intensity range of the photos such that each photo only contains pixels in the range best represented by that particular exposure.
This requires a graphics program like GIMP or Photoshop. The image below shows the way I do it: for the lowest exposure image, use the ‘curves’ dialog to clip the lowest values to black (leftmost graph). For the highest exposure image, clip the highest values to white (rightmost graph). For all other photos, do both (middle graph). If you're lazy and don't mind losing the very lowest and highest intensities, just apply the middle curve to all photos. If you look carefully at the histograms in these graphs, you'll see that there are peaks in the regions that are clipped away: these peaks are the noise we want to remove. The goal of this procedure is to avoid that any rubbish ends up in the overlapping zones between intensity ranges. (It would be nice if this feature could be added to Luminance's interface.)
Important: save the edited images in a lossless format like TIFF.

In the 2.6.0 version of Luminance, there is a bug that will cause white stains or impulse noise if the brightest input frame contains areas still dark enough to have pure black pixels (all zero RGB values). A fix has been implemented, so this should no longer occur in future versions. In versions that still have this bug, it is pretty easy to work around through another preprocessing step. In your brightest photo, use the select-by-colour tool to select all pixels that are pure black, and replace them with an RGB value just one step above black (RGB values of 1 on a scale of 255, or in HTML colour notation: #010101). Use this modified image as input image when creating the HDR.
Creating the HDR Image
Next, choose “New HDR image” in Luminance HDR and import the (optionally preprocessed) photos. If Exif data was lost during preprocessing, copy the EV values from the originals, using the Tools menu or by entering them manually. Now, decide whether you want to auto-align the images or not:
- If you took the photos with a tripod, or movement was limited to pure panning, leave autoalign off. Enabling it when not needed will only incur a risk of introducing errors.
- Otherwise, choose Hugin's align_image_stack, it is better than MTB. You should also enable Auto-crop.
You can opt to enable the Advanced Editing Tools. You must do this if you want to manually correct for subtle panning movements between the images. Otherwise it is still useful to check whether the automatic alignment worked or not, or to save the aligned images so you don't need to wait for the alignment again if you want to re-make the HDR image with different parameters.
Using the Advanced Editing Tools
After the optional automatic alignment did its thing, you will be presented the Advanced Editing Tools, if enabled. To check and possibly correct the alignment, zoom to ‘Original Size’ and select different reference and editable images. If there is a visible alignment error, try to correct it with the arrow buttons. It is best to stick to one fixed reference image, the photo taken in the middle of the sequence. For instance if 5 photos were taken, select the third one as reference. Then select each other image as ‘editable,’ and nudge them until they seem aligned with the reference. Well-aligned images will not show a ‘shadow’ effect in the preview as shown below.
 To save the aligned intermediate images in the Advanced Editing Tools, use the “Save Images” button and enter a name prefix. This is not necessary, but it allows to experiment with different profiles without having to go through the alignment step multiple times, by directly opening the aligned images as source files instead of the unaligned originals and skipping the automatic or manual alignment.

The most recent versions of Luminance have an “anti-ghosting” feature (older versions had this too, but it never worked). The idea is to mask certain parts in those photos where an object moved relative to the other photos. Dropping these masked parts avoids the typical “ghosted” appearances of moving objects. The object should be left visible in the photo where it has the best exposure, and be erased from all others. The automatic mode tries to do this all by itself and seems to work well for simple cases (a few moving parts in a stationary scene). Unfortunately at this time (version 2.6.0) the entire anti-ghosting algorithm has a bug that will mess up the exposure of the entire photo, so we'll have to wait a little more until this feature becomes truly usable.
HDR Creation Wizard
This is the main step that produces the actual HDR image. You need to choose a profile here that determines how the photos are combined into a single HDR image. In earlier versions I often had problems with all profiles except 5. In the newer versions however, these problems seem to have been fixed and it is safe to simply stick with either profile 1 or 2. The only major difference I can find between the profiles is that the even-numbered ones (Gamma response) produce a darker and more saturated result than the odd-numbered ones (Linear), so this is mostly a matter of preference. For scenes with extreme exposure variations like sunsets, I mostly use profile 2, otherwise 1. In case of doubt, try both.
In version 2.6.0, a checkbox “Show HDR Preview” is enabled by default which allows to quickly check the result. Uncheck this to proceed to generating the actual HDR image.
Once the actual HDR photo is generated, you end up in the main processing UI that shows a preview. You may notice that it looks weird and probably washed out, because your computer screen is unable to represent the true dynamic range in the photo. That is why we need tonemapping.
Tonemapping and Post-processing
As I said before, there are many tonemapping operators with many settings each. I found that to get the results I want, I need to mix the results from at most 3 of the operators, and often also the HDR image itself. The mixing ratios depend on the specific scene that was photographed and the desired effect. Photography and especially HDR photography is not exact science. It borders more on the side of art, therefore the following is only a recipe that will get you OK results most of the time, but you will probably need to add your own personal touch to get really great results.
I noticed that the Mantiuk ’08 operator is generally pretty good at getting the overall intensities right, but it can make the colours look dull and lose details. The Mantiuk ’06 operator is very good at representing local contrast and enhancing details in darker areas, but the overall image looks pretty flat and also lacks good colour saturation. The Asikhmin operator on the other hand has excellent colour reproduction while having trouble with the intensities.
Therefore, combining all of these is the basis of most of my HDR photos.
Sticking to the open source principle, I use the GIMP to combine the photos. The newest versions can handle higher colour precision than merely 8-bit and can open HDR images directly. My general recipe is as follows:
- In Luminance HDR, save the HDR image itself in OpenEXR format.
- Set Result Size to the original image resolution, and disable Auto Levels.
- Select the Mantiuk '06 operator and leave it at default settings. Click the ‘Update preview’ button and save the resulting image in PNG format, or 16-bit TIFF for more accuracy.
- Same for Mantiuk '08.
- Same for Asikhmin, but first drag its Local Contrast Threshold to 0 or just enable ‘Simple’ mode.
- Open these 4 images in your graphics program.
- Use the raw OpenEXR image as the base layer. Adjust its exposure to the point where the brightest zone in the image is about to become over-exposed.
- Add the '08 image as a new layer, start with a blend of 80%.
- Add the '06 image as a new layer, with a blend of around 30%.
- Add the Asikhmin image as a new layer, blended in multiply mode at around 60%.
That is the base cocktail. Turning this into an image you really like is up to you. This involves tweaking the mixing ratios, possibly adjusting the brightness/gamma curves per layer, and maybe even adding another copy of Asikhmin, but then mixed through HSV Saturation or LCh Chroma mode, to get deeper colours without the darkening effect of multiply mode. If you used an even-numbered HDR profile, you will need less saturation than with an odd-numbered one. In general, adding more of Mantiuk '06 will produce a ‘grittier’ photo, but don't overdo it or it will start looking weird. As for Mantiuk '08, sometimes you may want to drop it altogether if it makes things too bright. For night shots, you usually should add very little or even nothing of both Mantiuk operators.
Avoid the common pitfall of over-saturating the image (do not add too much of the Asikhmin operator). Compare with the original separate frames and try to make the image such that it represents the best parts of each frame while preserving the overall mood of the scene.
After merging all layers into the final image, it may still be necessary to do some brightness, contrast, and/or gamma tweaking to get the result really right. If there is anything you should remember from this: there is no single recipe that will consistently produce awesome HDR photos. Also, the way you would like the tonemapped HDR photo to look will depend on how you personally perceived the scene. You will need to tweak and test and sometimes try something new for a specific photo, but the above workflow should be a good starting point.
I recommend to have a set of reference photos of which you know they have a good overall exposure and natural saturation level, in other words they look “right.” Always compare your processed HDR image with these reference images before finalising it. One thing I have noticed is that my images tend to end up too dark if I don't compare them against a known good reference. This may be caused by the fact that the first unified result visible in the above workflow, is the non-tonemapped HDR image, which will be consistently too dark. This seems to throw off my sense of correct exposure and I tend to want to keep the final result somewhat similar to this dark raw image. A good set of reference images helps to ‘recalibrate’ and apply tone and saturation adjustments needed to obtain a natural-looking result.
An alternative to this entire procedure is to use the ‘Fattal’ operator. In older versions it was unreliable but since Luminance 2.3.0, this operator has been upgraded to produce consistent results regardless of resolution, and is sometimes good enough to use as-is. For not too demanding scenes it can produce instant results that are close to the manual procedure described above, although it tends to be over-saturated.
Examples and Conclusion
- Examples made with Panasonic Lumix DMC-FX37 photos
- Examples made with Panasonic Lumix DMC-GX1 photos
- Examples made with OnePlus Nord smartphone photos, with comparison of phone's own HDR
On my blog you can find some examples of results I obtained with the above method and a Panasonic Lumix DMC-FX37, a tiny compact camera whose CCD is so small that even photos in broad daylight are sometimes noisy.
Afterwards, I bought a Panasonic Lumix DMC-GX1 which has a more advanced bracketing function and a much less noisy sensor, allowing me to almost always skip the preprocessing step. On my blog you can find some HDR photos created with this camera as well—including a photo that directly violates the principle of “never take a photo with the sun shining into the lens!”
(I admit that quite a few of the images shown on both these pages are a tad too dark. I didn't yet follow my ‘reference photos’ advice when I made those.)
Currently I have an OM System OM-5 which has a specific HDR mode that can go up to preposterously wide EV ranges. (It can also produce a tonemapped image right away, but as explained below, I never use this.) Usually I still stick to plain EV bracketing though, because this can use the electronic shutter at high burst speed, unlike the dedicated HDR mode which uses mechanical shutter at slower speed. Plain bracketing is limited to ±2EV, but this suffices in most cases and the much higher shooting speed greatly reduces ghosting or misalignment between frames. Somehow this mode is still able to collect 5 nearly perfectly aligned shots even when hand-held shooting at exposure times around 1/10s. Gotta love IBIS.
Some recent cameras and many smartphones or tablets have built-in HDR functionality. This performs nothing more than a heavily simplified version of the entire procedure described above. This means two things: first, it will also produce smeared-out or ‘ghosted’ images if the camera or subject is moving while the successive photos are taken. Second, it will use a fixed algorithm that will not always produce good results. Usually it is not possible to store the raw HDR data or even the bracketed shots, only the final tonemapped image.
Luckily it is often also possible to take photos with exposure bracketing on smartphones, for instance by installing the Open Camera app, and then using those photos to generate a HDR image while having full control. To prove that this will usually beat the phone's built-in HDR, I have created another blog post with a comparison of photos made with my OnePlus Nord's built-in HDR versus my own HDR recipe.
More advanced cameras can capture true HDR in a single shot. This avoids the risk of ghosting and allows to actually film in HDR. Still I would not trust this for anything else than producing the initial raw high-dynamic range image. The tonemapping step has too many subtleties to be consistently done right by an automated algorithm. As with all types of photography, what sets a good photographer apart from an amateur is the skill, not the tool.
When looking at other people's HDR shots, they often give me either a washed-out or garish oversaturated, hence unrealistic result. Apparently the software or method they use has a tendency to flatten all intensities and compress them to the same range, making the scene appear as if it was illuminated with a big ass flash or worse, with a set of multicoloured floodlights because the saturation has been excessively boosted. Some people diss at HDR probably due to these kind of photos. The goal of the workflow described above is to produce realistic, non-exaggerated impressions of what the photographed scene really looked like.
Mind that HDR is not a miracle tool that will make all your photos look stunning. It is useless for perhaps 95% of all photographs. Only when photographing something with extreme intensity differences it can be useful or downright essential. There have been moments where I thought: this will look awesome in HDR
but the result hardly looked different from a plain photo, and also: this will work fine without HDR,
but it proved impossible to take a normal photo with no severely under- or overexposed parts.
If you like Luminance HDR and use it on a regular basis (or just want to support its development), a donation will encourage its developers to further improve it. If you liked this article, you may also consider donating to me to encourage me to maintain this website.
Go to the blog post that announces this article if you would like to comment.