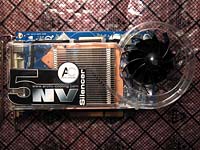
Installing an Arctic Cooling NV Silencer 5 on a GeForce 6600GT AGP
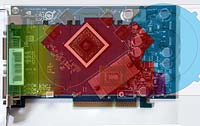
Around 2004/2005, The GeForce 6600GT AGP was a very nice graphics card, good performance for a good price. However, practically all of the standard coolers on this card have the same flaw: they emulate vacuum cleaners, coffee grinders or hair dryers. Also, as far as I know none of these cards use a temperature sensor to throttle the fan, so the noise is continuous from boot till shut-down.
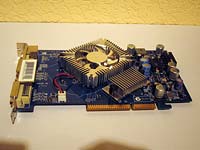
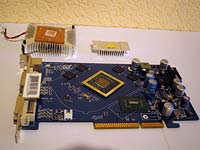
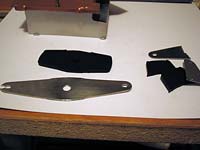
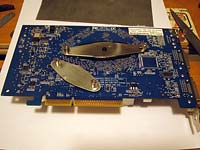
I have the XFX card, with the second version of the cooler. The first version was identical to nVidia's reference design. The second version was supposed to perform better. But it certainly wasn't designed to cut down the noise too. Instead of the monolithic reference cooler, it consists of a smaller cooler that covers the GPU core and a separate heatsink on the HSI chip. The first thing I did when hearing the noise, was to remove the useless decoration from the cooler, which consists of a separate piece of shiny metal with the XFX logo. It's very close to the fan, so the little metal bars of the logo cause extra noise, like the tail of a helicopter does every time the rotor blades pass it (OK, it's not that bad, but you get the point). I also used this opportunity to sand the fairly rough copper base of the cooler, and apply some better thermal paste (Arctic Silver Céramique). And because I found the cooler's push-down springs a bit weak, I stretched them to increase their force. The effect was: slightly less noise and a pretty nice drop in temperatures. So people who want an easy improvement in cooling performance and don't care much about the noise, can stop here.
However, after a while the hair dryer sound started to annoy again. Apparently, the only option was to install a Zalman VF700(Cu or AlCu), which is the only silent cooler that fits this card. However, my neighbor has a Zalman VF700 installed on his 6600GT, and I'm not too impressed. It still seems to make a sound that's definitely audible above the other fans. Stasis also has a cooler specifically designed for the 6600GT AGP, but it's hard to get where I live, and I don't know how silent it is.
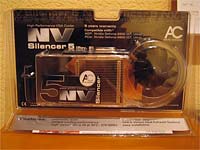
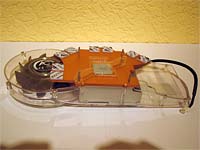
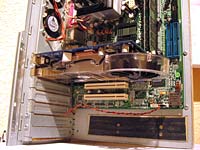
I was impressed with the reviews I read about the Arctic Cooling Silencers. They aren't just silent, but also very performant, and they blow the hot air directly out of the case through a PCI port. That's especially interesting for my custom Black Box case, because it has a very exotic lay-out which makes every extra air exhaust a welcome addition. Unfortunately there is no Arctic Silencer for the 6600GT AGP, only for the PCI-express model. On a forum I read about someone who said it would be possible to install an NV Silencer 5 on the AGP version, and almost tried it, but eventually decided to go for the Zalman instead. So I thought: why not try it myself? And I did!
How I did it
You can click the images to view larger versions in a separate window.
| The first thing to do was to check if this really had any chance of success at all. I downloaded a picture of the 6600GT AGP, and the scheme of the NV Silencer 5 from the Arctic Cooling website, and superimposed them (the scales are only approximately right, but good enough to check the feasibility). Of course it's obvious that I would need to cut a part off the copper sink. There were only two apparent extra problems visible: I would need to shift the cooler a bit to the left, hence cut off a part of the plastic exhaust; and in the side view (not shown here), a few capacitors are clearly in the way of the plastic, so I would need to make a few holes. But for the rest it looked feasible enough! 
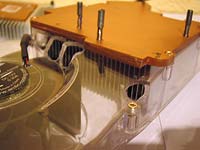
I also checked the other Silencers this way, but only the NV 5 is usable because it's the only one that covers all the mounting holes. |
|
| I found an NV Silencer 5 in a German web shop for a very neat price, low enough to destroy this beautiful cooler and waste its 6-year warranty without too much remorse. If you plan to follow me in this endeavour, this is something you should realize: you'll have more chance to get warranty on your modded NV Silencer by sending a dead bunny in a box to Arctic Cooling, than by sending in the modified Silencer itself! 
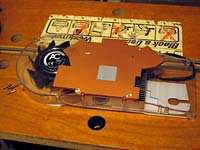
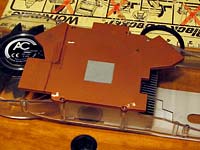
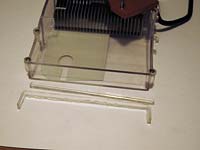
Also mind that if you plan on doing this, you absolutely need to have some skills in working with all the tools that are required, and enough patience and precision. You will need to cut the copper sink, drill perpendicular holes in it, cut screw thread in them, and cut the tough plastic of the Silencer. A 'Dremel' tool or similar is highly recommended. |
|
| This is the card, with the 'modded' standard cooler (removed logo). 
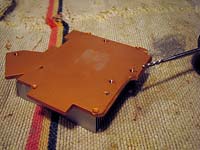
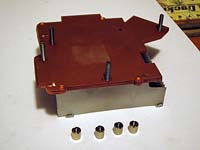
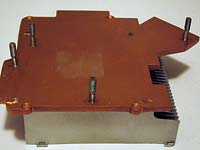
Stage 1: remove the standard cooler and HSI heatsink. | |
| The cooler was piece of cake, I had already done it once and I knew pinching the black clips at the back with pliers did the trick. However, the clips of the HSI sink were a lot nastier. I had to pinch them really hard, and often the pliers would slip off, and for some reason went straight for the board every time. During one of these slips, the inevitable happened: I hit one of the tiny capacitors right next to the mounting hole, effectively pulverizing it, or at least sending it somewhere never to be found again. I won't write down all the curse words I uttered at that moment and the death threats towards the inventor of these clips. 
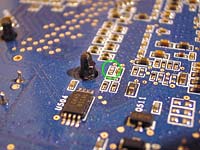
But once I cooled down, I immediately put the cooler back on and tested the card. After all, this was a very tiny capacitor and my guess is it's just a filtering cap. Most IC's have lots of these capacitors around them to filter the supply voltage, and many of them are actually just put there by convention (it never hurts to put too many of them). And this proved to be one of the redundant ones, because the card still ran Far Cry and DOOM 3 without a glitch. Phewww, what a relief. So, back to work. If you plan to remove the HSI heatsink yourself, I recommend this method, which I used afterwards with success: push the springs down through the card so the clips stick out a bit at the back. Then you can safely cut a bit of the plastic off their sides with a knife, so they become narrower. Then you can pinch them through the holes much more easily. Or, if you don't think you'll ever need the clips again, you can just cut them off. |
|
| This is the 6600GT AGP with the coolers removed and the core & HSI chip cleaned. I covered the core & HSI chip with pieces of thin cardboard to protect them during the upcoming experiments. Now it's time to tackle the NV Silencer! | |
| This is what the freshly unpacked NV Silencer 5 looks like (mounting clip removed). Mind that this is the Rev 2, which has a completely flat copper sink with thermal pads for the RAM. The Rev 1 is unsuitable because instead of using pads, the heat sink protrudes where the RAM chips are, which makes it impossible to mount on the 6600GT AGP. There is now a Rev 3 of this Silencer, which apparently is identical except for the replacing of the mounting clip with a large heatsink-like thing. As you'll see below, the smaller mounting clip of the Rev 2 can be recycled for this project, so if you're going to try this yourself, try to find a Rev 2 Silencer. Also notice the neatly pre-applied thermal paste, which will have to be neatly removed because it's totally in the wrong spot for this project and won't survive the upcoming massacre anyway. | |
| I removed the RAM pads and stuck them to a piece of wax paper so I could re-use them later. The mounting pins are the first victims of the Dremel. They appear to be 2mm pins with an M2 screw thread. I'll use M3 for the new pins, simply because I had some M3 screws handy. I remember they were already pretty hard to find, so my guess is that M2 screws will be nearly impossible to find. The mounting holes in the PCB are exactly 3mm, so M3 is OK, although it will require very precise alignment. More on this later... | |
| This is how I'm going to cut the copper. It's a compromise between creating space for the capacitors, still covering the mounting holes, and keeping the amount of curves minimal. For cutting, it's pretty obvious that I first separated the plastic part from the copper&aluminum sink. Then, using the Dremel, I cut a trough to about halfway the 5mm of copper (this wore off almost an entire amaril disk). Then I cut the rest with a simple figure saw. Yes, this worked pretty well. The copper is quite soft, so the thin saw went through it quite easily. A thicker saw has the risk of getting clogged with the soft metal. | |
| After cutting, I drilled 4 holes at the exact positions – to my best abilities – of the mounting holes. I had marked them by positioning the cooler onto the card at the optimal position, and then sticking a thin marker through the holes. After drilling, I cut the M3 screw threads into the copper with an M3 machine tap. | |
| I cut some M3 screws to the right length, these become the new mounting pins. Instead of using boring and unpractical hexagonal M3 nuts, I enlarged the holes in the nuts that were provided with the NV Silencer, and cut M3 thread in them too. Much better! It was a pain to get then properly clamped, though. They are so smooth that it's hard to keep them from rotating during the cutting of the thread. | |
| Because it was apparent that the positions of the holes weren't exact enough to allow easy mounting of the card, I cut away the lower part of the screw thread of the pins to provide more space. After slightly bending one of the pins, the graphics card now slides almost effortlessly onto the cooler, and it's possible to nudge it around a bit. The pins are final now, so I fixated them with a little bit of glue. | |
| The original mounting clip is a plus-shaped thing with 4 holes at the ends of the plus. Apparently the holes of one ‘axis’ of the plus were only a tiny bit too close to each other to coincide with the two mounting holes of the GPU, so I cut a slit into one of the ends. Now the clip (turned into a minus by cutting off two ‘arms’) and its rubber support can be recycled on the modified cooler! This was way better than trying to concoct some mounting clip on my own which may or may not work. | |
| Of course the two parts of the clip that I cut off were unusable for anything. So, for the mounting holes of the HSI chip, I did have to make my own clip. It's made out of zinc, which is not perfect because it's not very elastic like the steel of the original clip. But after testing a bit, it proved to be good enough. And I still could recycle the two rubber parts that I cut off the original rubber support, to put under this clip (in this photo there was only one part under it, that's why you don't see it). | |
| Only two things left to be done: first, cutting holes for the tall capacitors right next to the heatsink. The rightmost hole in the picture actually didn't need to be that deep. I could have re-sealed the holes with tape, but I think the ‘leakage’ of airflow will be negligible anyway. | |
| Second: cutting a tiny part off the cooler's exhaust, to compensate for the fact that it has been shifted a bit to the left. After sawing, I sanded it to absolute smoothness, only to dremel off another millimeter and re-sand because it wasn't enough yet. In the end, I ended up right against the two little screws, I even sanded a tiny bit off their heads. This proved to be perfect for the exhaust to fit with no gap, without being pushed too tightly against the case to cause stress on the card. | |
| Actually, one extra tiny thing left to do: one of the RAM chips isn't covered by the Silencer's copper sink. So I mounted a small RAM heatsink on it, after cutting it to the right shape for it to fit as close to the Silencer as possible. For the other RAM chips, I re-stuck the thermal pads to the Silencer at the right positions. Maybe this chip with the separate sink won't be cooled as well, but considering the fact that it originally had to do with whatever stray exhaust air the box cooler provided, this should be better than nothing. Moreover, in my case the card is quite close to the 120mm fan of the power supply, so there will be airflow after all. | |
| This is it! I carefully cleaned both the cooler and the card to remove any potential metal chips from the drilling and cutting processes. The cooler is properly and sturdily mounted onto the graphics card, with thermal paste and the thermal pads for the RAM. Time to take it for a spin! | |
| No problems whatsoever while installing the card in my 'Black Box' case. As expected, the exhaust fits perfectly against the special PCI slot clip that was provided with the Silencer. Now it is time for a test run... 
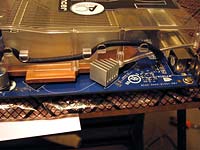
When booting up the PC, it was immediately apparent that all the hard labour had payed off. No more vacuum cleaner sound! I actually checked if all fans were spinning, because it seemed too silent to be true. But it was true. The next thing I checked were the temperatures. I had measured them before under a room temperature of 19.5°C. Now it was about 20.5°C, so you'd have to subtract 1°C from the new temperatures to get equivalent readings. The results are in the table below. |
Mind that the temperatures are all under idle (after the PC has been fully warmed up with some gaming), and were measured in Linux, where apparently the GPU temperature is reported about 6° lower than in Windows. But we're only interested in temperature differences anyway.
| CPU | Motherboard | HD | GPU | |
|---|---|---|---|---|
| Before, room 19.5° | 44°C | 33°C | 34°C | 44°C |
| After, room 20.5° | 44°C | 32°C | 30°C | 39°C |
| After, normalized to 19.5° | 43°C | 31°C | 29°C | 38°C |
So, the GPU's temperature dropped by a nice 6°C. Not super-spectacular, apparently my modified standard cooler with vacuum cleaner ambitions wasn't bad on the performance front. But on the noise front, the improvement is huge! I can't hear the Silencer at all next to the other fans in the case. Some nice side-effects: the HD dropped by 5°C, which can be explained by the exotic arrangement of components in the Black Box case. The HD is positioned right above the main air intake holes, and the extra airflow caused by the Silencer causes more air to flow past the HD. The motherboard temperature has also dropped slightly, which proves AC's claim that sending the exhaust air directly out of the case helps reducing the case temperature.
Conclusion
So the hard work was well worth it. Nevertheless, if you're now so enthousiastic that you think of doing the same, I would still recommend to go for the Zalman instead. The only valid reasons to take this crazier approach are:
- you also have a cramped custom case like mine that can benefit from the Silencer's extra exhaust;
- you really know how to pull this off — mind that even with all the pictures and details I didn't even tell half of the story;
- you are able to work very precisely and are familiar with all the required tools.
The steps I had to take to mount the Silencer on my 6600GT AGP also make it understandable why Arctic Cooling hasn't yet made a specific model, and likely never will. The design of the card is too different from most other graphics cards. If you look at the diagrams on the AS site, you'll see that all Silencers are based on the same reference design: two types of plastic casings with different copper/alu sinks, which are designed to fit multiple card types. This is what allows AS to make these things at competitive prices. A Silencer for the 6600GT AGP would only fit this specific card, and would need to have a custom heatsink and custom plastic casing design. Moreover, the 6600GT AGP is not a big part of the market and won't stay for long. Therefore, creating a custom Silencer just for this card is not commercially viable.