BTplug Review
Intro
Some people require a computer that is online 24 hours a day, 7 days a week, that runs simple servers and services, and is accessible from the internet. Often, there is no need for this computer to be powerful, so just taking any bog standard PC that continuously gobbles up several dozens of Watts is a total waste of electricity. Popular ways to minimize power consumption are using old laptops, underclocking the CPU, or trying to beef up simple routers so that they get the abilities of a normal computer, albeit with severe memory and storage restrictions.
There are some low-power solutions specifically designed to fill this gap in the computer market. A few examples are the SheevaPlug and GuruPlug and the Alix system boards. There are even computers that can be mounted in the wall like a power socket. However, most of these run on non-x86 compatible processors. This is mostly not a problem since people often compile a custom Linux for these computers anyway, or use a Linux distribution that comes with these devices. But, it would be interesting if a computer existed that both consumes very little power and can run standard x86 binaries. This would also allow to build and test the operating system and utilities on a standard PC without the need for an emulator.
With the advent of the Vortex86 System-on-Chip, such computers have become possible. The Vortex86 is an entire low-power x86-compatible computer on a single chip. It only requires few extra components and RAM chips, and uses only two Watts of power. It supports the i586 instruction set and comes in two variants (at the time of this writing; a third variant is coming up). The naming of these two variants, the “Vortex86SX” and “Vortex86DX” have made some people believe that these CPU's are just beefed-up 486 CPU's, but they're more than that.
Of course, most people can't do much with a raw 581-pin BGA package. They need a finished product that can be used as an actual PC. At the time of this writing, there are only few such finished products available. One company that has a range of computers using the Vortex86 CPUs, is NorhTec (or was, their website is now dead). They have (or had) the Gecko EduBook, a laptop which can run on standard AA batteries, and the Gecko Surfboard, a Commodore-like keyboard with built-in computer. However, for a simple headless box that will be gathering dust most of the time, those are overkill or unpractical. Norhtec also offers specific headless boxes, but they are rather expensive and only available in large quantities.
The Chinese have come with their own offering of a headless Vortex86-based computer, which I stumbled upon mostly by accident. It is not well-known and as with most of these Chinese products, not well advertised. The device is called the BTplug and proved to be exactly what I was looking for. It has only the bare essentials: a Vortex86DX CPU at 933MHz, 512MB RAM, a 44-pin laptop IDE header, two USB 2.0 ports and one 10/100 Ethernet port. It is claimed to use less than 4W. The price was pretty OK: US $93 + $25 shipping and handling, which amounts to less than €100 at the time I ordered it. For a bit extra, you get an additional IDE to CompactFlash adapter + cable.
Inside the Box

$25 is not cheap for shipping such a small box but the package proved to be sent by express courier, so I didn't have to wait the usual two weeks. It arrived only a few working days later.
Judging from the (former) BTplug website (used to be bbs.homenas.com) that only shows a photo of the ‘motherboard’ at the time of this writing(1), it may seem that you'll only get a circuit board with power adapter (and the optional 44-pin IDE cable and CF adaptor). So it was a pleasant surprise to see that the BTplug actually comes with a nice white plastic enclosure. Although it is called a plug computer
on the website, it isn't exactly one like the SheevaPlug, but it comes close. The rest of the package contents were a 12V 1A mains adapter with USA prongs, a European socket adapter and a DVD with Linux disk images. I specifically mentioned in the PayPal payment form that I needed something compatible with Belgian power sockets. If you live in a country with non-USA power sockets and want to order one of these, don't forget to notify the seller.

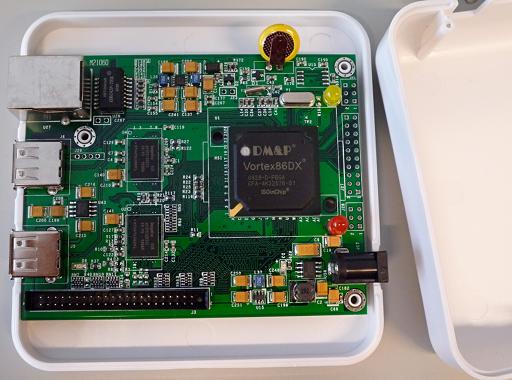
The BTplug enclosure measures 107×107×38mm. It is easily opened by removing three small screws. The board itself is 100×79mm. As you can see from the first photo on this page, the CPU doesn't even have a heatsink. There are provisions to mount one. As you'll read further on, if you plan to run this machine in an environment that is even a little warm, I do recommend to mount a heatsink. I also recommend drilling holes in the bottom and sides of the enclosure to provide some airflow.
Next to the input/output ports mentioned above and the DC input jack, there are some more provisions on the board: two TTL-level serial ports, a set of GPIO ports, and an extra USB port. All of these are not immediately accessible though, you will need to solder PCB headers onto the board and make your own cables to use these extra ports. See the pinouts section for more information.
Installing Linux with an Oscilloscope and Soldering Iron
The DVD with Linux distributions that came with the BTplug seemed promising at first, as it contained various supposedly ready-to-use disk images that would boot the device and start an SSH server, pretty essential to get access to the machine. There is a tiny 48.5MB image to be run from a USB flash disk, two large Debian images of about 1.4GB to be run from either IDE or USB, and one 163MB Debian image to be run from a CompactFlash card. However, all images are in an obscure format that I have been unable to use. The files have extension “.GHO” which would indicate that they are Norton Ghost images (supported by versions up to Ghost 2003). They also start with the correct ‘magic number’ for a Ghost file. However, I tried various versions of Ghost (including 2003) and none correctly recognized the images. Ghost reported the only image that it could open as being of more than 1 TeraByte in size, yeah right!
I mailed the seller for more information, but never got a response. Until someone can give a hint as to what program could open these files, I have to say that the DVD that comes with the BTplug can only be used as a coaster. That is, if you don't have a habit of spilling too much of your drink, because the coaster has a hole in the middle.
Even if the images would have worked, I still would have installed my own Linux, just to have something that only contains what I really need. I decided to install Gentoo because I am familiar with it. Mind that I don't recommend Gentoo to everyone. It's a great distro if you don't mind getting your hands dirty and if you want to be able to tweak almost everything. If you just want something that works, you may want to try other distros.
The great advantage of a Vortex86-based system like the BTplug is that it is x86 compatible. You can prepare and tweak a bootable Linux system on your PC (directly or in a VM), put it on a USB stick or hard drive, check if it boots on your PC, and then try to boot the BTplug with it. If the boot has failed, you can plug the stick/drive back in your PC and check the logs. That's also exactly what I did first. As an initial test, I downloaded Puppy Linux because I had read on forums that people have successfully booted it on the Gecko EduBook. Puppy is a very small distro (only 50MB) that can be installed to and run from a USB stick, and it allows to install extra software. I booted the Puppy USB stick on my trusty old Athlon XP PC, set the root password, installed an SSH server and added some scripts to /etc/init.d/ to automatically start Ethernet and get an address through DHCP upon boot. Then I plugged this stick in the BTPlug and booted it. This worked: after checking my router's DHCP logs for which address was assigned, I could connect to the BTplug through SSH.
Puppy Linux is designed to be a portable Linux with a graphical interface that can be booted anywhere. It's kind of your own portable desktop environment. Thus, despite its small size, it's full of stuff that is of no use on the BTplug which doesn't even have circuitry for connecting a display. Also, Puppy is heavily geared towards being used through the graphical interface. Using it from the command-line only is not really recommended, so it was only useful as a first test and to see what kernel modules it loads to get running on the BTplug.
Only recently I discovered that the manufacturer of the Vortex86DX has a page with their own Linux distribution, called X-Linux. It may be worth checking out if you don't want to build your own kernel, but judging from the description you'll still need good knowledge about Linux to do something useful with it.
Building a Custom Linux
The next step was to build my own Gentoo Linux specifically for the BTplug. I did this entirely on my old Athlon XP PC, not just because it has the convenience of a monitor, but because it's a lot faster than the Vortex86. I won't go into the details of installing Gentoo of course. I'll only mention some important points:
- Because everything will run from flash-based memory (an SD card in my case), writing operations should be minimized, both because writing to flash is slow and to avoid needless wear of the flash memory. This starts with the choice of the filesystem(2): ext2 is preferred over ext3, because ext2 doesn't need to constantly update the FS journal. It is also possible to use ext4 with journaling disabled. The filesystem should be mounted with the ‘noatime’ option to avoid updating access times each time a file is opened.
- The BTplug has a generous amount of RAM, which means it is perfectly feasible to mount directories like
/tmpas RAM disks with tmpfs. This again avoids wear of the flash disk and is much faster. For Gentoo, mounting/var/tmp/portageas tmpfs is also a good idea if you plan to install packages on the running system. If you're using a rather large flash disk, you can create a swap file as a life buoy in case tmpfs runs out of RAM, but swapping on the flash disk is to be avoided at all costs. - You will want to set up both GRUB, the kernel and the system so they provide root console access through a serial port (ttyS0), as you'll see below. Set the rate to 115.2kbaud, as this is also the rate used by default by the BIOS.
- All built-in devices of the Vortex86 SoC are reported as RDC Semiconductor devices. More specifically, ‘lspci’ shows the following devices:
R6021 Host Bridge (rev 02), R6031 ISA Bridge (rev 02), R6040 MAC Controller, R6060 USB 1.1 Controller, R6061 USB 2.0 Controller
andIDE Device 1011 (rev 01).
- There are two options for getting IDE to work: either you can enable CONFIG_PATA_RDC, or you can enable CONFIG_PATA_IT821X after fixing the kernel source to enable it to recognize the 1011 device. The latter is probably optimal, but I had no problems with the RDC driver. There are conflicting reports whether you need to set the IDE mode in the BIOS to legacy or native. Again, I tried both without problems.
- There is no point in enabling fancy power-saving options in the kernel, because the CPU consumes almost nothing on its own. You can enable generic power management and ‘Run-time PM core functionality’ to put unused USB devices to sleep, which seems to work on the BTplug.
- You can check out the config file in the sources of X-Linux (
/etc/kernel-config/) if you're unsure about certain kernel options. - Of course, you should also include the necessary things to run your other PC on which you'll test and tweak the Linux installation before copying it to the BTplug. You can configure GRUB to boot with parameters for the BTplug by default, and include a second item to boot optimally for your PC. I had to add “
rootdelay=10” to the kernel line to get my PC to boot from USB. For the BTplug this seems unnecessary. - Add “
pnpbios=off” to the kernel parameters for booting the BTplug. - Configure your network and make sure that an SSH server starts automatically upon boot. Don't forget to set the root password and add extra users if desired.
Booting

I first installed Linux on a 2.5" USB hard drive. As you may have experienced, such drives rely on the assumption that most USB ports can deliver a current larger than the 500mA dictated by the USB 2.0 standard. This assumption doesn't always hold, hence USB-powered disks will start skipping or outright refuse to work if they don't get enough power. The bad news is that the USB ports on the BTplug seem to adhere to the USB standard and don't deliver much more than 500mA, because my external disk was constantly on the limit between working and not working. A solution is to provide external power, but since it was a 2.5" disk with 44-pin connector anyway, another option was to take the disk out of the enclosure and hook it up directly to the IDE connector on the board, and this worked perfectly.
Now, the big problem was that although the activity LED clearly showed that the system booted at least up to a certain point, there was no sign of life on the Ethernet port. There was also nothing in the logs when connecting the disk back to the PC, so the boot must have failed early. I needed a way to see what was going on, and the only option was to use the serial ports to connect another computer as a serial console. The big problem was that there is no documentation at all for the BTplug, so although I knew that some of the headers on the motherboard were serial ports, I didn't know which ones and what the pinout was. Given my previous futile attempt to contact the seller, I figured it would be faster to figure out myself how to get a working serial connection. I compiled a simple program that continually sends data on the ttyS0 serial port and ran it (through SSH) from the Puppy USB stick. Then I used an oscilloscope to detect on which pin (or rather, hole) the serial signal appeared. From the voltages I could also see which pins were input and which ones output. I then modified the test program to alternatively send and read, and searched the Rx pin by looping the Tx pin to the two candidate input pins. The result of this experiment can be seen in the pinout section.
Connecting a Serial Console

I soldered headers onto the board, but it is not sufficient to simply connect those pins to the serial port of a PC because the BTplug uses TTL signal levels, which are inverted and of lower voltage compared to RS-232. So I needed to convert the signals as well. One can buy simple TTL-to-RS232 or even direct TTL-to-USB adapters, but I was too impatient to wait for one to be delivered, so I built my own with a dual op-amp. If you want to build one yourself according to the circuit at the right, make sure to use an op-amp that is fast enough for a baud rate of 115.2k if you want to get into the BIOS of the BTplug. Also, check that the op-amp can handle -12V w.r.t. the ground on its inputs, or add an extra diode at Tx232.
With the serial connection working, debugging problems on the BTplug became an order of magnitude easier. It's basically the same as connecting a monitor. Moreover, it allows to change BIOS settings as well (worst idea ever: disable serial access in the BIOS). You can use another PC with Putty under Windows, Minicom under Linux, or ZTerm under OS X to emulate a serial console (or get that VT100 from the attic). In my case, two things proved to have prevented to BTplug from booting: the hardware clock was so far in the past that the ext2 file check panicked and on top of that, eth0 got renamed to eth1 because of the different MAC between the BTplug and the PC on which I built the Linux. So, you can do without the serial console if you avoid pitfalls like these, and get networking and SSH to work from the start. Once connected through SSH, you're off. But believe me, you can save yourself a lot of frustration and wasted time with a little bit of soldering and by getting a TTL adapter. You can mount a 2.5mm or 3.5mm stereo jack for easy plug-in serial access later on.
An alternative that doesn't require a serial console (hence no soldering) is to use netconsole which allows logging through UDP via the network cable. This will not allow to get into the BIOS of course, but for most people that will be unnecessary anyway.
Once the Gentoo Linux was properly set up for the BTplug, I cloned it to a 16GB SD card with rsync and swapped the hard disk with an IDE-to-SD adaptor. The serial connection proved again useful to fix the bits that I forgot to set up after the rsync. Now if I want to do a large update, I simply rsync the system back to the USB drive, update it on my faster computer (either by booting or chrooting) and then rsync it back. This is both fast, easy to troubleshoot, and minimizes flash write operations due to the update.
Performance
Power Consumption
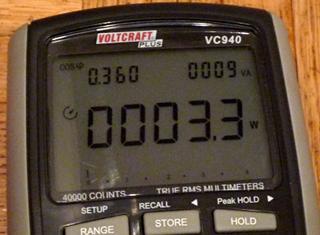
First of all, does the BTplug consume less than 4W as promised? Yes it does! With the supplied 12V mains adapter, average power consumption is about 3.3W. It fluctuates a bit, but only occasionally reaches 4W. I figured though that nothing on the motherboard requires more than 5V and the circuit near the DC jack serves as a DC regulator. So I plugged in a 5V adapter just for kicks. Surprise: it works! More surprise: it brings total power consumption further down to an average of about 2.8W. This is probably due to two things: my 5V adapter being more efficient than the provided 12V adapter, and less losses in the regulator circuit because it only has to pass through the incoming power without conversion.
The BTplug would be ideal for Power-over-Ethernet, because it meets all the requirements. I don't have the means to test it though, but I'm afraid it is not implemented. The lay-out of the motherboard doesn't show signs of PoE, and most of all, it was not mentioned on the (former) website. They would not forget to mention such an important feature.
I have configured my BTPlug as a tiny low-power NAS, with an attached 1 TB 2.5" HD sitting on top of it. The HD cannot draw enough power from the BTPlug, yet it is still possible to run both devices from a single power supply. The easy way is to use a powered USB hub if you can find or solder a 5V power plug onto a USB cable. Connect the BTPlug to the hub with this cable as well as with the USB uplink cable. The hard disk will then get the USB signal from the BTPlug and the power from the hub. Or if you don't mind soldering a little more, you can make a simpler device that does the same from some leftover parts like I did.
Speed
The next thing I tested is how well the Vortex86DX @933MHz performs, as well as the system as a whole. First of all, I ran a simple benchmark program of my own that counts how many times various calculations and data-processing operations can be executed during a fixed time. I have been running that program on many different machines so this allowed me to conclude that overall, the BTplug is somewhat comparable to a fast Pentium II or a slow Pentium III-based PC. It heavily depends on the task however, for convolving an image the Vortex86 is slower than anything I've benchmarked yet, but for creating a word histogram from text it is comparable to a Pentium 4. Emerging small packages in Gentoo is perfectly feasible, but you won't want to compile a kernel on the BTplug if you're in a hurry.
A note about the Vortex86DX: I have found rumours on some forums that the Vortex86DX would support MMX, but this is untrue. The cpu flags in /proc/cpuinfo only mention fpu tsc cx8,
and a test program to check the availability of MMX fails. The newer Vortex86MX does support MMX.
As for I/O, I tested if the 100MBit Ethernet is exploited to its limit by downloading and uploading large files to and from a RAMdisk through FTP over the local network. The speed was close to 10MB/s in both cases, so the only bottleneck is the speed of the network. I also tested copying files from and to an external USB hard drive. I obtained speeds between 15MB/s and 25MB/s, which is more than enough to saturate the network connection. So, putting these two together gives the most useful scenario for people who intend to use this as a NAS: I uploaded a file directly from the USB disk through Ethernet to another machine. This gave 7.5MB/s, so there seems to be some overhead(3), but it is still pretty good. SCP is limited by the CPU: I got 3MB/s when scp'ing from a RAMdisk to another computer.
Stability
The first months I was using the BTPlug as a NAS, I encountered occasional total system freezes. These were completely random and only seemed to happen during heavy I/O load, for instance when running bittorrent or copying a lot of data from or (especially) to a USB disk. The problem seemed to be related to NFS, therefore I switched to netatalk to mount shares on my Mac through AFP. This appeared to eliminate the crashes and also proved much less hassle in daily use than relying on OS X' crippled NFS support.
A while later though, the crashes returned, again triggered by heavy I/O load. It became obvious that heat played a big role: the crashes always happened on hot days, never on cold winter days. The total lack of ventilation in the plastic case obviously did not help, therefore I drilled a lot of holes in it and mounted a heatsink on the CPU. Even this did not help on real hot summer days, so mounted a small fan to vent the case, which made all the difference: the machine has been running rock-solid ever since. My conclusion is that you will want to keep this thing as cool as possible, I would recommend keeping the CPU below 40°C.
I have encountered very sporadic cases where after booting up, either the USB interface performed poorly (very slow transfer speeds), or there was no network connection although the ethernet interface appeared OK to the operating system. Both these problems were fixed by a reboot. It is unclear whether these were hardware glitches, bugs in my particular custom-built Linux, or related to the overheating problem.
Pinouts
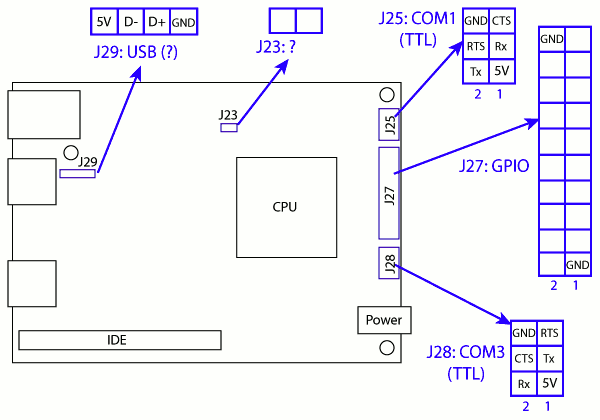
I had to either measure or guess all these pinouts due to lack of documentation on the BTplug, so there is no guarantee for correctness.- J25 is the first serial port (COM1 or ttyS0), probably the only thing of interest to anyone who doesn't want to go beyond using the BTplug as a mini-server. It has only 4 signal pins instead of the usual 8 on a 9-pin serial port, so I'm not sure what the two other pins next to Tx and Rx exactly are, only that one is input and the other one is output. It would make the most sense if those pins are CTS and RTS respectively.
- J28 is a second serial port, but it is COM3 instead of COM2, which is incorrectly enabled in the BIOS. You will need to enable COM3 (and optionally disable COM2) in the southbridge configuration to use this port. Beware that the pins are arranged differently from J25.
- J27 is a large array of GPIO ports. The 18 in/out pins are inactive but can be configured from the BIOS.
- J29 should provide a third USB port unless I'm mistaken. I haven't tested it, so try at your own risk.
- I have no idea what the function of J23 is. Most likely it is a BIOS reset jumper.
- There's an additional unsoldered 6-pin header at the bottom of the board, no idea what that is (maybe another serial port?)
The Bottom Line
The BTplug is an x86-compatible headless computer that is both very small and very power-efficient. Because the BTplug motherboard is well-built and is therefore mostly a transparent interface to the Vortex86DX SoC, many of the following points apply to any Vortex86DX-based computer in general. Its qualities and drawbacks are as follows:
Pros
- It's so small it can be tucked away almost anywhere, like under or on top of your router.
- With an efficient adapter, it uses less than 3 Watts on average, so it can run 24/7 without pillaging your electricity bill.
- It has an i586 compatible CPU so it will run most prebuilt x86 packages. Prebuilding and updating software before deploying it on the machine can be done in an x86 virtual machine or an old PC.
- It has 512MiB RAM, two USB 2.0 ports, one 100MBit Ethernet port and an internal 44-pin IDE header.
- It comes in a nice plastic enclosure(1).
- There is not a single moving part, it is completely silent.
- Performance is not bad given the ±3W power rating.
- It is reasonably priced.
- It is not picky about the power supply voltage. Anything between 5V and 12V DC will work.
Cons
- It is completely ‘headless’. There is no VGA port, which makes installing an operating system tricky. To install or debug something, it is almost a must to use a serial console. This is not really a disadvantage given the nature of this device, but combined with the next point, it is.
- To be able to use the serial ports, you need to solder headers, identify the function of the pins (luckily you can now simply find them on this page), and use a TTL to serial/USB adaptor.
- The USB ports do not provide enough power to run a 2.5" hard disk in a USB enclosure, not even when connecting the disk to both ports with a Y cable. You need to connect such disks through a powered hub or with their own power supply.
- The Linux disk images that came with my BTplug were in a format that cannot be easily used.
- It comes with no manuals or diagrams, and support is mostly absent.
- Stability seems compromised above a certain temperature and becomes worse with higher temperatures. Heavy I/O load is pretty much guaranteed to crash the entire machine when room temperature exceeds 30°C. Adding extra ventilation is highly recommended.
So, it is cheap and small, both in physical size and power usage. This makes it ideal to run permanently, with e.g. USB storage attached as a NAS, and/or as a small lightweight server with much more RAM and storage than the typical router with custom firmware. The CPU is pretty capable and can easily run for instance bittorrent software. The only caveat is the difficulty to get it running. You need to either connect a serial console, or boot from an operating system that has the right support for the hardware and automatically starts an ssh server. The bottom line is, if you're looking for a computer like this and you don't mind to tinker a bit, this is certainly worth checking out.
(1): now (2011/12/14), there is a new version in a slick metallic housing, which has four USB ports and room for a 2.5" HD as well. For the rest, the specs are the same and the lay-out of the board is probably similar.
(2): I briefly considered using LogFS for the filesystem, but it had only recently been added to the kernel. Moreover, LogFS is only really useful if one has direct access to the flash memory, which is not the case with SD or CompactFlash cards in an IDE adaptor. Most controllers in such cards have at least some basic provisions for wear leveling, and the more expensive cards have advanced wear leveling built-in. I guess that with my minimal precautions my SD card will survive longer than the useful lifetime of the BTplug anyway.
(3): Afterwards I discovered that the duplex setting of the NIC is not always properly auto-configured, which can cause severe performance loss. With full duplex enforced through ethtool, I easily reach 10MB/s as well when reading from an external disk through ftp and NFS.