Making a QTVR Panorama from a Marathon Map |
There's no better way of offering a preview of your map than creating a panorama from it. I even know someone who used this technique to create previews of real buildings, by making them in Forge and then converting them into a panorama after having edited the snapshots in PhotoShop. Although this tutorial focuses on Marathon and Forge, similar principles could be used in other games.
The method is pretty similar to the one used for creating a panorama with a set of normal photographs from a real scene, as described in the QTVR-section of my site. The difference is that the photographs will be replaced by screenshots, and it will be less work because most values are fixed and it's possible to work very accurately without the need of artefacts like $250 tripods or laser-guided position systems.
The following is divided in two parts: a first part which always needs to be done, namely making the screenshots in a correct way; and a second part which you only should read if you want to use my own rather obscure, but free, transformation program (which, however, delivers impeccable results when used correctly) instead of an expensive commercial stitching program.
Section 1: making the screenshots
There are different ways of making the necessary screenshots. You could simply walk around in the level, choose a good spot and then start "screenshooting", hoping that you won't have your ass kicked by an alien or a BOB. However, this is an unhandy method which delivers inaccurate results, and you need to start all over if your screenshot program crashes in the middle of the process (which ALWAYS happens with mine), because you'll never be able to look up exactly the same spot again, which is really necessary.
So I'll describe the method I use, which is an easy-to-use "recipe". This method works with 8 sets of screenshots, which means that you need to turn 45° each time. You could make a panorama with only 8 screenshots, but this results in a limited vertical pan, so it's better to push the vertical pan to the max, by using 24 screenshots: 8 sets of 3.
Step 1. Instead of walking around in the level and choosing a spot on-the-fly, it is better to make sure you can control the position of the player (= "viewer") exactly. You should also remove all aliens that could be activated, or make them deaf&blind. In other words: you need to make a special copy of the level in Forge. First choose the spot where you want to make the panorama, and place the player there. Then you still have the problem of rotating exactly 45° each time. This can be solved by making 8 copies of the level with the player pre-set in the right directions, which can be done quite accurately in Forge by setting the "Facing" as follows for each of the 8 levels:

Also make sure to provide a teleport polygon in each level to easily switch to the next "level", i.e. viewing angle. And, last but not least: make all levels of the type "Rebellion", this will hide the player's fists so they don't screw up the screenshots. When finished, merge all levels into one file.
Step 2. Now you can start making screenshots. Normally, you can't do this using the standard Command-Shift-3, so you could use a special application, like Snapz Pro from Ambrosia Software. (This is ShareWare, but if you won't use it for anything else than making an occasional panorama, you don't need to feel guilty if you don't pay the fee.) However, you can also just type "%" in Marathon, which will allow you to take screenshots by typing the familiar Command-Shift-3 (typing "%" actually makes Marathon allow background processes).
For taking the screenshots, it is highly recommended to use the full screen setting (press the "1" key). You see, full screen is useful for something! This setting gives more detail and still has a large enough field-of-view (50°) for 8 screenshots only.
You could simply take one screenshot per view (so 8 in total), but that will give you a pretty poor vertical view in the panorama. So it's better to take three screenshots per view: one where you look all the way up, one when looking straight ahead and one when looking all the way down. Afterwards, you can paste these three parts together into one large screenshot, resulting in an awesome vertical pan. So just start taking screenshots, and make sure not to move or turn until you have the three shots of that view. Then walk over to your teleport polygon to go to the next view, and so on. (On the last level, make sure to include a SPNKR and a room full of BOBs to celebrate the end of your work!)
If you use some external screen capturing tool, you'll probably experience some crashes while taking the screenshots, at least that's what happens with me all the time. I guess it must be Snapz or maybe the combination Snapz-Marathon. But if you use the system described above to create the views, you can easily pick up where you stopped without loosing any accuracy.
Step 3. Now you have 8 sets of 3 screenshots. Open them in a graphics program, and combine each set of 3 corresponding screenshots into one big screenshot, which should have a height of 1254 pixels. Position the screenshots as exact as possible. You may want to rescale the result to 50% to reduce the size of the resulting panorama, unless you really want all details to be perfectly visible.
Section 2: making the panorama
Now you have 8 big screenshots. If you are going to use your own stitching program, just save the images in the right format and feed them to the program, which will probably be happy to process such clean and perfect perspective projections. If you want to use my own program, read on.
First, download the program, "RAW PanoTransformer". It actually is not a program, but a HyperCard stack. This means you need HyperCard or the HyperCard Player to run it. The HyperCard Player is included on older Mac OS installation CD-ROMs, and it can also be downloaded from the Apple site.
If you are using PhotoShop, you may want to create an "Action" (= macro) for the following process.
Step 4. Flip the 8 images vertically, rotate them 90° clockwise and adjust their brightness with +2%. The reason for all this, is that the program can work more efficiently with the images in this orientation, and the brightness must be increased so that there is no pure black or other pure RGB colours in the image, because the program can't read such bytes. You must also crop the images' widths and heights to uneven numbers, i.e. remove one pixel if necessary. E.g. if you rescaled the images to 50%, they should become 319×627 pixels, if you leave them the original size, 639×1253 pixels.
Step 5. Save the resulting images in RAW format, non-interleaved, no header. RAW format is the most primitive image format, it only contains the pixels of your image. So you need to remember the dimensions yourself!
Optional: you now may want to restart your Mac with extensions turned off (hold down Shift wile starting up until the message appears), because for some reason the program runs much faster then.
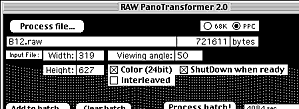
Step 6. Start RAW PanoTransformer. Fill in the right values, which are the parameters of the images before rotating. For 50% size: Width=319, Height=627; for 100% size: Width=639, Height=1253; and Viewing angle: 50 in all cases. Color: ON, Interleaved: OFF (unless you really couldn't prevent your graphics program from saving them interleaved, but mind that things will work much slower this way).
Step 7. Load all 8 files into the batch list. You probably are starting to wonder: "Why starting with extensions off for maximum speed, why a batch list? Is this thing really that slow?" The answer is: YES! This will probably be the slowest program you've ever seen. Realistic times on an 8100/110 PowerMac are 30 minutes per 100% size screenshot, so 4 hours for an entire full-size high-resolution panorama. This is just because the thing is a HyperCard stack, and HyperCard is not intended for image processing. If someone wants to re-write this application in C(++) for me, mail me and I'll explain you how it works.
Step 8. Wait, wait, wait. You may want to start the process in the evening and let your Mac work overnight. But if you have a G3 or G4, take a coffee break and chances are that it'll be ready when you return.
Step 9. Open the transformed files, which are also in RAW format. Their widths are the heights of your original images, and so on. In other words, for 50% size: width=627, Height=319; for 100% size: width=1253, Height=639. Number of channels: 3, interleaved: YES (!) Indeed, the images are saved interleaved, because this was easier to implement…
Flip the images vertically and rotate them 90° clockwise again to get them back in the correct position.
Step 10. Now you need to stitch the images together. You'll see that, unlike the originals, they fit perfectly onto each other. This stitching process shouldn't be hard, it will be much easier than with real photographs because here we are dealing with perfect perspective projections. The brightness level of all images is also the same and the horizon is perfectly in the middle, which is never the case with real photographs. Don't forget to make the left and right borders of the image fit together too! In PhotoShop, you can use the "Offset" function for this.
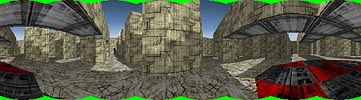
After stitching, you'll notice 8 "dents" at the top and bottom of the image, illustrated below with the bright green areas (in reality, they will be black). The easy way to get rid of them, is to crop them away. The better way, which will maximize the vertical pan, is to fill these areas with copies of the rest of the image, using PhotoShop's "Rubber stamp" tool for example.
When ready, adjust the brightness & contrast levels to your taste, rotate the entire image 90° counter-clockwise and save it in PICT format.
Step 11. You now need the "Make QTVR Pano" application from Apple. It used to be available at the Apple QTVR page in the "Tools" section. Unlike the $470 QTVR Authoring Suite, this program is free! The only thing this application does, is transforming the PICT file into a genuine QTVR panoramic movie. Open the program and then open your PICT file, or drag the file onto the application's icon. You'll get various options, of which the most important are:
- Compression: a common compression for panoramas is CinePak, which ensures smooth playback on slow computers. If your image has few details you can use a heavy compression (40% or lower), or you can test different settings and see the results in the preview. But nowadays, computers are getting faster, so you can use JPEG compression, which offers excellent image quality with very small file size, but it's more processor-intensive during playback.
- View Size: the size of the viewing window. You could use anything here, but I always use a size which is proportional to the original Marathon view size of 640×320, like 320×160.
- Default Horizontal Pan: the starting position in degrees, if this is 0 you'll start on the line which makes the connection between the left and right borders of your image.
- Default Vertical Pan: determines how much you look up or down when opening the pano, in most cases it's better to leave it 0.
- Default Zoom: Important, since wrong zoom settings will cause unrealistic distortions when viewing the panorama. This is the percentage 100*(vertical f.o.v.)/(maximum vertical f.o.v.). You could calculate the exact value in order to achieve the same view as in Marathon, but you can assume from me that a value between 50% and 60% will give a good result.
Click "Create", wait a bit and… your panorama is ready! You will have two resulting files: a tile movie and the actual panorama. You can trash the tile movie, unless you want to make another panorama from it with different settings.
This method can also be used for other 3D games, although you'll probably never have such a good way to create a custom level file for making the panorama. However, if you can display debugging information like in Duke Nukem 3D, you can set the angle very accurately. Looking up and down won't work in the newer games like Quake and Unreal, because these don't simply scroll the view. However, in Quake you can exchange detail for vertical pan by using the command "fov X" where X is the desired f.o.v. angle (normally 90). The horizontal f.o.v. is then (this angle)*(width of the viewing area)/(height of the viewing area). In most other games you'll also need to hide the weapons by taking the screenshot at the right moment while swapping weapons. If you have an editor (like Quiver for Quake), you can apply the same strategy as explained above (i.e. create a separate level for each angle).