Video Encoding Tips
Ever so often I see a poorly encoded video on the internet, which either has black bars, interlacing artefacts, too low bitrate, too large size, incorrect aspect ratio, … and in the worst cases, a mix of all these things. Here are some short tips to reduce the risk of making these mistakes.
The tips give concrete instructions for the program HandBrake, which is a freely available, popular, and good tool for encoding videos—if you use it correctly.
Ensure your aspect ratio is right
In short: ensure that a circle in the original video is still a circle in your encoded video. For anamorphic material (non-square pixels), you should only convert it to square pixels when downscaling it, otherwise you should preserve the pixels as they are.
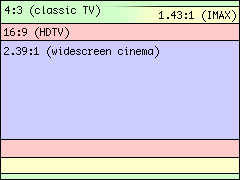
The aspect ratio is the width of the displayed video image divided by its height. For instance, classic TV shows had a ratio of 4:3, modern widescreen video typically is 16:9. Make sure that no matter how you rescale your video (e.g., if you you want to reduce the resolution to make it smaller), the proportion of width divided by height remains the same as the original.
There is one caveat here regarding standard-definition TV material. Suppose you have a recording on DVD in standard 480p widescreen format. This means the video frames stored on the DVD will have a resolution of 720×480 pixels. Mind how this does not correspond to a 16:9 ratio even though your TV displays it as such, it is actually a 3:2 ratio. What gives? Well, your TV knows that the video is supposed to be displayed as 16:9 and will therefore stretch it horizontally while rendering the image. This means the pixels are not square, like they are in all recent formats like 720p and 1080p. The cinematographic term for this is ‘anamorphic’ video.
When converting such a DVD to a video file on a hard disk, you may be tempted to make the pixels square. My advice is not to do this unless you are downscaling the video. If you want to simply store the video with minimal loss of image quality, you should keep the original resolution (in this example: 720×480), and ensure the aspect ratio information is preserved, such that the media player knows how to stretch the image. In Handbrake, ensure ‘Keep Aspect Ratio’ remains checked, and ‘Anamorphic’ is set to Auto.
Since the advent of smartphones, videos are now often shot in ‘portrait’ orientation, leading to a tall and narrow image that is awkward and wasteful on regular widescreen displays. Needless to say, if you are shooting video with a smartphone and it is not intended to be played back exclusively on smartphones, please do the tiny effort to rotate the phone 90 degrees, unless your goal is to give the spectators the sensation of watching a film through an open doorway. If you want to make a video that is aimed at both smartphones and regular screens, a square or 1:1 aspect ratio is not a bad idea, because it will always be played at the largest possible size regardless of the orientation of the screen.
Apply proper deinterlacing
In short: never rely on ‘smart’ deinterlacing methods unless the material is a mix of interlaced and progressive. If the input is certain to have no interlacing, then don't take any risk of automatic interlacing detection activating at the wrong moments, just disable everything related to deinterlacing altogether. Otherwise, ensure deinterlacing is enabled if you know the video material is interlaced. Never use deinterlacing methods that simply throw away half of the video scanlines! Make sure that the framerate of the output matches the field rate of the original source material (e.g., 24 FPS for a feature film, 50 FPS for a PAL TV show).
If the input is a movie that was converted to NTSC by a hard telecine process, enable detelecine and force the framerate to 23.976 FPS.
Interlacing is the practice of embedding two video images in one frame, with each odd line of the frame belonging to the first image, and each even line to the second (or vice versa). This stems from the era of cathode ray tube (CRT) televisions. The tube would first print the first set of lines (called the first ‘field’) and then the second. This way, one could transport for instance 50 fields-per-second material through a 25 frames-per-second transmission. (In the rest of this page, ‘FPS’ always means frames, not fields.) Of course, the vertical resolution of each field was halved, but in case of a static image, each frame retains the full resolution. This was a clever trick to exchange temporal and spatial resolution. Mind that even if a 25 FPS interlaced video stream only has 25 unique images per second, it will still be interlaced: every frame will contain a field with half the previous image, and the other field will contain half the current image.

Interlacing does not play well however with panel displays, which lack the memory effect of a typical CRT that provides a natural smoothing of interlaced material. Moreover, your average computer monitor is totally unaware of whether you are playing something interlaced or not. Many media players simply dump the interlaced frames on-screen, resulting in typical ‘combing’ artefacts as shown in the image. Some media players can perform deinterlacing on-the-fly, but the quality may be bad. If you are re-encoding an interlaced video anyway, it is better to apply high-quality deinterlacing to obtain a progressive video that can be readily played. Removing the interlacing artefacts also makes the video much easier to compress.
Never trust automatic deinterlacing
There are two main approaches here: either always deinterlace unconditionally, or try to be smart and only deinterlace for frames (or even parts of each frame) that appear to be interlaced. My experience with software that tries to be smart, is that it rarely manages to get beyond the trying part. If interlace detection fails, you'll end up with stuttering video, as well as remaining artefacts (especially visible in animated material).
If you know the source is interlaced, it makes no sense to rely on automatic detection because it will only incur a risk of the detector missing certain parts and leaving them in the end result as ugly artefacts. Just always deinterlace an interlaced source video! Similarly, if you know the material is entirely progressive, disable both interlace detection and any form of deinterlacing: you will gain a bit of encoding speed, and eliminate the risk of destroying details that happen to look like interlacing. Especially the sharp lines in animations (cartoons) are problematic for automatic deinterlacing methods. Other material with large uniform areas and tiny details, like a view of outer space with smallish space ships, also tends to confuse interlacing detectors.
Just don't take any risks, do not rely on artificial stupidity. Keep the ‘Interlace Detection’ setting in HandBrake set to ‘Off’ at all times. The only time when it is warranted to enable interlace detection, is if you know the source contains a mix of interlaced and progressive video that is not easy to separate by manual cutting. This kind of source material is usually very rare however.
Yadif or Bwdif vs. decomb
There are many different methods to deinterlace video. The dumbest methods simply throw away half of the video scanlines and interpolate to fill in the voids. The result is awful: you get the worst of both worlds because both the higher still frame resolution as well as the potentially higher temporal resolution have been destroyed. Never ever use these methods. If you suspect your video editing software might use a method like this, force it to deinterlace a video containing a perfectly still image of text or line art, and compare the input with the output, it should look identical. If not, the deinterlacing method is bad.
The deinterlace settings in HandBrake have changed names quite a few times. In the most recent version at the time of this writing, you can choose between ‘Yadif,’ ‘Bwdif,’ and ‘decomb’. My advice is to only use either the ‘Off’ or ‘Bwdif/Yadif’ settings in the deinterlace menu. Bwdif is an improvement over Yadif for regular video footage, but I find it to be worse for things like anime or other material containing line art. When in doubt, try both on a short fragment and pick the best.
Avoid decomb, unless you are dealing with the rare case of mixed interlaced and progressive material, because this is one of those dubious algorithms that attempts to only apply deinterlacing when it believes it to be appropriate. I'm not sure whether Handbrake's automatic interlace detection is less dumb than decomb's attempt at being smart, so it is better to err on the safe side and avoid using either unless really needed, and when you do encounter this rare situation, try both and pick the best result.
There are better deinterlacing methods than the ones offered by HB, like QTGMC, so if quality is really paramount and the options in HB don't cut it, you need to look for another tool.
(Why don't I like decomb? Well, the makers of decomb claim that automatic interlacing detection is useful even if the source is interlaced from start to end, because it would allow to preserve details in frames where there is so little motion that artefacts are barely visible. This is wrong. A good deinterlacing filter will automatically preserve all detail in a static interlaced video scene, if it can accurately simulate the effect of a CRT combined with persistence-of-vision. If a deinterlacer blurs details in a video fragment showing a still image, it simply means the filter is poorly implemented.)
Inverse telecine
Now that we have explained the above, the second question is what the framerate of the result should be. This is not a trivial question because a 30 FPS video might for instance represent a 24 FPS feature film, 60 fields-per-second video, or even a 25 FPS European TV show.
When converting a 24 FPS film to NTSC format, the so-called telecine process is used. This duplicates frames and interlaces them in a specific way to obtain 30 FPS. (For the nitpickers: the actual framerate will be 30/1.001 ≈ 29.97, with the film equivalent being at 24/1.001 ≈ 23.976.) The good news is that many DVDs do not use a ‘hard telecine’ where the process is applied to the encoded video, but instead contain progressive video with markers that tell the playback device to perform telecine. When encoding such material, it requires neither inverse telecine nor deinterlacing. If you encounter a hard telecined video however, you need to enable an inverse telecine filter (‘detelecine’ in HandBrake).
Very important: when using detelecine, set the framerate of the output to 23.976 FPS (24/1.001 to be exact). If you would keep the original 29.97 FPS, you would end up with one duplicate frame every 5 frames, which looks jittery. If you encounter a poorly made encoding that suffers from this, you may attempt to fix this using HandBrake, but it is likely to fail. Only if you are extremely lucky you might be able to re-encode it at 23.976, and the framerate reduction might happen to remove exactly the duplicate frame each time. In general this is utopian and you'll end up with both dropped and duplicate frames, which looks awful. The proper way to fix this is to use FFmpeg with its ‘decimate’ filter combined with ‘setpts’ to reliably delete the duplicate frames.
Animations, especially older ones like the classic Looney Tunes, are likely to have been made for cinema at a 24 fps frame rate hence might also be telecined when stored on a DVD. Modern animated TV shows however are more likely to have been created at TV frame rates. Anime might run at 12 fps or even only 8 fps, but it is usually a bad idea to encode them at those frame rates because they are non-standard and perhaps some segments run at higher rates hence would end up lacking frames. The message here is to try different settings in the encoder, and see what looks best in the end.
(Note: in Europe the discrepancy between film and TV framerates is handled differently: because the 25 FPS framerate from PAL TV is close enough to 24, the film is simply sped up by 4.2%. The audio as well, which is why you would hear for instance Walter White on a European TV speak in a pitch almost a semitone higher than in the USA.)
Regular deinterlace vs. ‘Bob’
The first implementations of deinterlace methods only tried to produce one deinterlaced output frame per input frame. As I explained above, video may contain two unique fields per frame and in that case one would want two progressive deinterlaced frames per interlaced frame. In HandBrake the deinterlace filters have a ‘Bob’ preset (no idea where the name comes from). This is the one you need if you want to get both fields out of a single interlaced frame, and you must also set the output framerate to twice that of the interlaced input. Only enable this if the video really has two fields per frame, otherwise you'll just get each frame repeated twice.
It is unfortunately difficult to give a set of rules for determining correct deinterlace and framerate settings for your output video. You won't find video with two unique fields per frame too often, because a lot of TV material was shot with film cameras running at 24 or 25 FPS. Only material directly recorded with electronic video cameras will typically have true 50 or 60 fields per second. When in doubt, my advice is to try the ‘Bob’ filter first, force the framerate to twice that of the source, and do a short test encoding on a fragment of the video. In a player that can advance frame-by-frame, check the output of a scene with a lot of movement. If every frame is unique then you should stick with ‘Bob’ and double FPS for the entire video. If every other frame repeats, you can use regular deinterlacing and stick with the framerate of the source.
If you apply proper deinterlacing or detelecine and set the correct output framerate, the result must have neither repeated frames nor ‘ghosting’ due to mixed fields or frames.
As an extreme example of framerate misery: at one time I (nearly) managed to recover the original 25 FPS video frames from an NTSC conversion of a PAL TV show. Although this conversion is similar to telecine, it is not the same and an inverse telecine filter cannot be used. In HandBrake, I enabled the ‘Bob’ deinterlace filter and forced the framerate to 25, and then I hoped that the offset of the frame resampler was in sync with the process that had duplicated frames for the NTSC conversion. This was the case for many of the episodes, but for quite a few of them I had to manually add or repeat the first few frames to get the sync right. It did not take long before I gave up and simply bought the PAL DVDs. This scenario only makes sense if the PAL source would be unavailable, and again FFmpeg would be a better tool for this.
Remove letterboxing (‘black bars’)
In short: your output file should not have any black bars above or below the image, except in a film with mixed aspect ratios. Always verify whether automatic cropping did not cut away too much!

Remember the part about aspect ratio? What happens when a film has been made in for instance a 21:9 ratio, and needs to be stored in a format that is forced to always have a 16:9 ratio? The image is not tall enough to fill the entire height. The solution is simple: add black bars or so-called ‘mattes’ above and below the image. This is called ‘letterboxing.’ In principle you could just re-encode a letterboxed video as-is, but there are a few potential problems. First, if the black areas are not perfectly black but contain a bit of noise, you will be wasting precious bits on encoding this useless noise. Second, the sharp edges between the black areas and the image will require more bits to encode and can cause compression artefacts at lower bitrates. Third, the black bars may prevent the player from displaying the video in full screen, depending on its aspect ratio. Therefore it is highly recommended to crop away any letterboxing when there is no strict requirement on the aspect ratio of the encoded file.
Another reason to remove mattes is that they waste space in the video encoding and decoding buffers. Devices usually conform to a certain ‘level’ that specifies limits on memory buffer sizes (see below). For instance, a device that can play H.264 at level 4.1 can hold 4 full-size 1080p reference frames in its memory. More reference frames offer more opportunities to describe the next frame as a combination of previous frames, hence better efficiency or better quality within a given stream size. If you are encoding frames at full 1920×1080 size but the actual content only occupies 1920×864 pixels or less, then the space occupied by the mattes is large enough to store an extra reference frame. Not cutting away the mattes means for no good reason throwing away the opportunity to benefit from that extra reference frame.
The good news is that programs like HandBrake have a pretty good automatic crop feature. In HB it is enabled by default. You must always have a quick look at the image preview window however, to see if not by a freak chance the program picked all dark frames for detecting the auto-crop, and therefore cuts away too much of the image. Increasing the number of picture previews in the preferences, reduces this risk. You still need to ensure the aspect ratio of the result is right and matches that of the true source material, not of the letterboxed image.
There is one caveat: some films can have a variable letterbox. Sometimes aspect ratios are being switched to achieve a certain effect. For instance, The Dark Knight (2008) is recorded in a mix of IMAX (1.43:1 aspect ratio) and regular film format (16:9, or 1.78:1). If the autocrop would only look at the regular segments, part of the IMAX image would be cut away. An even more extreme example is “I Am Not Madame Bovary” (2016) which for the most part has a 1:1 ratio (a circle), but also other ratios in some segments. In this case there is no way around encoding at a frame size whose width and height are the largest occurring across the entire movie, and leaving the letterbox around the segments that do not fill this entire frame.
(In theory you could cut the film into the pieces with different ARs, encode them separately, and then merge them in a container format that supports multiple ARs. But even if you could manage to do this, in practice hardware players are likely to have problems with it.)
Be careful with HandBrake's automatic anamorphic setting
Mind that if you rely on HandBrake's ‘automatic’ anamorphic setting and you have selected a specific resolution limit, you may end up with an anamorphic result even if the source was not anamorphic. The idea is to preserve as much resolution as possible when both cropping and downscaling a video, by non-uniformly stretching the pixels to fill the entire maximum frame resolution. In my opinion this is only a good practice when encoding for DVD (which should become increasingly rare these days). For anything at 720p and beyond, the common practice is to stick to 1:1 aspect pixels, and deviating from this might cause problems with certain playback devices.
Never upscale
You might be tempted to upscale SD material if you are going to play it back on HD screens, or likewise upscale HD to UHD. Don't! For archival purposes, stick to the original resolution. Even if you are going to use some fancy AI upscaling algorithm instead of the bog standard interpolation that HB (currently) offers, after a while this upscaling method will be outdated and then you are stuck with your inferior upscaled material.
Always re-encode at the same resolution and leave the upscaling to the playback device. If your playback device has poor upscaling, you could make an upscaled video file with something fancier, but this file should be considered disposable.
Use an appropriate bitrate, or a constant quality
In short: use quality-based encoding and forget about bitrate whenever you can. Otherwise, use two-pass encoding.
How much bitrate a certain video requires to be encoded with sufficient fidelity that there is no visible quality loss or no obvious degradation, depends on two main factors: the efficiency of the codec and the content of the video. It is obvious that a video where every frame is a perfectly black area requires almost no information to describe (in fact, I just gave the description and it only took 51 bytes). The other opposite would be a video where every frame is perfectly random noise that cannot be predicted. Real videos are anywhere in between. Generally, the more stuff moves, the more ‘noise’ in the image, and the harder to describe the visual content, the more bits are needed to represent it adequately.
The efficiency of the codec depends on its capabilities and how it is configured. Generally the longer encoding takes, the more efficient the end result will be because slower encoding usually means a deeper search for the optimal way to encode the frames. In recent versions of HandBrake, the tab with advanced codec settings is gone and is replaced by a single ‘preset’ slider that can be set between ‘ultrafast’ and ‘placebo’ for x264. Drag this slider as far to the right as you can bear until encodings take too long. The slower the encode, the fewer bits the file will require to offer the same visual quality. Never use the ‘placebo’ preset however because as its name implies, it does not offer any noticeable improvement. I generally use ‘slow’ when making a file I want to keep or distribute to others. For a disposable file, for instance to convert a h.265 file to h.264 so I can play it once on an older device, I use ‘veryfast’ with a low RF setting.
There are two main ways to encode a video file:
- Enforce a certain bitrate. Either the bitrate is enforced across a short time window, or as an average across the entire file.
- Enforce a certain minimum quality. The encoder will dynamically vary the bitrate to ensure the quality meets the minimum.
For some reason the fixed/average bitrate has become the typical way in which most people encode their videos although it makes little sense for modern use cases. The only case where enforcing a certain bitrate per second makes sense, is when streaming over a limited capacity channel like digital TV broadcast. The only case where enforcing an average bitrate across the entire file makes sense, is when the video file must fit in a medium of limited size like a DVD. The average user nowadays stores films on hard drives and has a network bandwidth that far exceeds the capacity of HDTV, therefore should not really care about the bitrate as long as it stays within bounds of the limits of their playback device.
If you have no strict requirements on how large the video file must be, using quality-based encoding makes a lot more sense. It has the additional advantage that it only requires a single pass. In HandBrake, select ‘Constant Quality.’ The ‘Rate Factor’ (RF) slider for H.264 is an exponential slider: for every notch you move it to the right, the output size of your video file will be roughly multiplied by the same factor. The RF 0 value actually means lossless encoding. The lowest sensible RF value is widely considered to be 18 (beyond that, you're wasting bits on encoding invisible details). The highest sensible RF value is about 28. For high-definition movies, 22 is generally a good value, for DVD material it is better to stay around 20. You can use higher RF values if you want to stuff more movies in the same disk space and don't mind that it will be a little more blurry. Mind that the actual quality also depends on the preset. A file encoded at RF 22 with the ‘slow’ preset will usually but not necessarily be smaller than one encoded with the ‘fast’ preset, but even when it isn't smaller, it will likely look better.
Nevertheless, if you need to ensure a video file has a certain size, a fixed average bitrate is the way to go. My video bitrate calculator can be of use to determine the required bitrate. Very important: when encoding this way, you should always enable two-pass encoding. This will first do a run over your video file to determine where to spend the most bits to keep the overall quality as constant as possible, then it will do the actual encoding. It takes more time (can be reduced with “turbo first pass”) but the end result will be much closer to the desired file size while having the best possible quality within those limitations, than if you would only do a single pass.
Audio bitrate (and volume)
When making a file that is intended to be squeezed on a small medium or streamed over a limited bandwidth, it may be tempting to scrounge bits off the audio bitrate in order to keep a somewhat higher video bitrate, but this is generally a bad idea. Audio is usually much smaller to begin with, therefore skimping on audio bitrate won't gain much. It will only cause both video and audio to become bad. Viewers are generally forgiving when the image isn't great if audio is good, but not the other way round. Only if your source has for instance a 5.1 soundtrack and you're encoding for a portable device, you can and should gain a lot by downmixing the surround track to plain stereo or perhaps even mono.
I should not need to mention this because it should be obvious, but I'll do it anyway just to be sure: you can never increase audio quality by re-encoding a low bitrate track at a higher bitrate, so please never do this. Once something (audio or video) has been compressed at a lower bitrate, the information is forever lost and you cannot get it back unless you start over with the original track as source.
Also, please do not mess with the audio volume. Do not try to make it louder unless you are absolutely sure that the original really is too silent and has the headroom to increase the gain without causing clipping of the waveforms. If you don't know what I mean with the previous sentence, please do not touch the audio at all. If the codec and bitrate of the original are good, just pass through the original track without re-encoding it. I encounter too many rips with audio that is just awful, so please don't make more of those. (If you want to know why trying to make digital audio louder is generally bad, I have another article that explains this for music.)
A note about DTS: please never transcode something from 1.5 MBps DTS or any other format to 768 kbps DTS—which should never be used. DTS is excellent at full bitrate but quality degrades very quickly when going below that. At half-bitrate it has very audible quality loss especially on music. If you cannot afford to preserve the full DTS bitrate, re-encode at 640kbps AC3 instead, which offers much better quality than 768kbps DTS.
Colour bit depth
H.264 allows representing colours with 10 bits per colour channel instead of the 8 bits that used to be the standard, and H.265 even allows 12 bits. Using more bits helps to reduce ‘banding’ in areas with smooth colour transitions. Obviously your playback device and screen must support the higher bit depth to get any benefit from it.
Just as one cannot improve video or audio quality by transcoding a lower bitrate source at a higher bitrate, the same goes for colour bit depth. You will not get nicer colours by simply re-encoding a blocky 8-bit video at 10 or 12 bits. At best it may help to more faithfully represent the original, but any quantisation artefacts already present in the source material will also be faithfully preserved. Do not misleadingly label videos as “10 bit” if they were encoded from an 8-bit source, always mention the bit depth of the original in such case.
The only situation where it makes sense to encode an 8-bit source at a higher bit depth, is when applying denoising to remove film grain. If there are dark scenes or near-uniform skies where the film grain helped to mask banding artefacts, you will need more bits to avoid banding when smoothing out the grain. When using HandBrake, mind that you need version 1.6 or newer to benefit from this: older versions were constrained to producing a denoised image at the same bit depth as the input.
Profiles, Levels, and Tiers
Regardless of whether you encode quality-based or with a target bitrate, you should take care not to exceed limitations of the device you'll be playing your videos on. H.264 has two main ways of specifying playback device capabilities: profiles and levels. Profiles can be ‘baseline,’ ‘main,’ and ‘high,’ and levels are indicated by a number like 4.1. The efficiency of the codec increases with increasing profile. The bitrate, frame size, reference frames buffer size, and frame rate limitations of the playback device increase with increasing level. For the average 1080p smart HDTV that can play videos from a USB stick or a network stream, a safe bet for Full HD videos is High profile at level 4.1. If you want to use higher levels, check whether the player can handle them.
H.265 (HEVC) does not have profiles, instead it has tiers. For all practical purposes, you should probably stick with the ‘Main’ tier, the ‘High’ tier is only meant for special applications (and HB only offers the main tier anyway at the time of this writing). HandBrake offers some variations on the main tier. The ‘infra’ variants will encode each frame only using references within that same frame. Only use this if there is a specific need for it, because it greatly increases the bitrate requirements. The other variants allow to use finer chroma subsampling than the default 420. Again, this requires higher bitrates, and it is pointless to re-encode source material that has 420 subsampling (pretty much all consumer content) at higher settings like 422 or 444, so only use those if you know what you're doing.
H.265 also has levels, but they do not correspond to H.264 levels with the same number. Otherwise the same goes: only encode at a level that does not exceed the maximum supported by the targeted playback device(s).
Denoise if necessary
In short: if you want to preserve film grain, you will need a very high bitrate. If you want a small file, apply denoising to get good image quality at a low bitrate. NLMeans works best.
Modern codecs like H.264 are pretty good at keeping quality acceptable even at lower bitrates. However, although these codecs do have a kind of denoising effect at low bitrates, below a certain point this breaks down and the codec makes a mess of it. If you have a noisy video source (e.g., low-quality VHS tapes, a DVD of an old TV show, a film with a lot of ‘grain’), and you cannot afford encoding it at the extremely high bitrate that will correctly preserve all the noise, then it is a better idea to filter out as much of the noise as possible before the actual encoding starts. The codec will then have a much easier job at producing a good image at a low bitrate.
Recent versions of HandBrake have two types of denoise filters: the old HQDN3D (has nothing to do with Duke Nukem 3D by the way), and the new NLMeans. The HQDN3D filter is fast and appropriate for material with mild high-frequency noise like minor film grain. If it still does not give good results at the ‘light’ setting, try the NLMeans filter instead: it is much more computationally expensive hence much slower, but it performs much, much better in general. When properly configured, NLMeans can remove most of the noise while preserving details in the image, while HQDN3D will inevitably degrade the entire image. You should first do a few test runs on a fragment of the video to see what kind of result you obtain with various settings, and how much of a reduction in bitrate they offer compared to an encode without denoising.

Above is an example of denoising on a fragment from a film with quite a bit of grain. Hover over or touch the titles to see the different results. The bitrate figures shown are for a fixed-quality encoding at RF 21. This shows several things: first, the bitrate requirement is excessive without denoising. Second, although the ‘strong’ HQDN3D setting achieves similar denoising performance as ‘medium’ NLMeans, it destroys most of the fine details while the latter does not. Third, even though NLMeans does preserve more detail, overall it still removes more noise and results in the lowest bitrate at this RF setting.
HandBrake also offers some other filters, like deblock which I deem obsolete. It is very slow and tends to destroy relevant details, NLMeans is a much better alternative. The sharpen filter does what it says: it will sharpen the image, which is generally to be avoided because any noise and artefacts present in the source will also be amplified. Also, sharpening a video will generally mean a higher bitrate required to encode without introducing distortion. Only sharpen if there is a good reason for it.
Caution: there is a bug in the NLMeans filter of HandBrake versions 1.4.x and 1.5.x: bright pixels leak from the right of the image to the left, causing annoying glitches. This bug is fixed in version 1.6.0. As mentioned above, this version is also able to produce denoised video at a truly higher bit depth than the input.