How to make a QTVR object
Like the “make a panorama” text, this text is also totally outdated: mentioned software is obsolete, as is QTVR as a whole. Even while QTVR still existed, there were probably programs available that made it a snap to produce an object movie. But, some of the information about obtaining the pictures may still be useful.
A QTVR object movie consists of different views of the object. When dragging the mouse over such a movie, QuickTime will display the views according to your movements. In fact, an object movie is nothing more than a plain movie with some extra info added to make it an object movie.
Making a QTVR object is somewhat easier than a panorama because you don't need to apply spacy transformations or stitch images together with expensive applications. If you have a simple 3D CAD program, you can create nice results, and with a bit of sense for accuracy you can create state-of-the-art photographic objects. Before you start, make sure you have QuickTime 3 or newer (if the "SkullCrusher" movie below doesn't work, you don't have it). If you don't, get it at the QuickTime site.
Taking the pictures
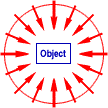
To make an object movie from photographs (for example, from a car), you need a set of photos which are taken at specific positions around the object. These positions need to be on a circle and the photographs must be taken at regular divisions of the circle (see image). So if you want to take 16 photos, you must divide a circle in 16 "pie pieces" and take the photographs on the corners of those pieces. For small objects this is not too hard, but for larger objects you may need to use special constructions to determine the right positions (or just guess).
You could also do it the reverse way, this means: keep the camera still and rotate the object. Again, for small objects this is piece of cake, but for a car...
Most object movies consist of a single row, this means that you only have a view at one fixed height. But it is possible (and very cool) to make an object which can be viewed at different heights (or even from all possible positions). Theoretically it's easy: just take another set of pictures from a higher position (with the same distance between camera and object as in the first position). But again for larger objects, this requires special equipment.
The amount of photos will determine the "coarseness" of your object movie. 16 photos (which is about the minimum for a decent movie) will result in a somewhat "jerky" viewing. 24 photos is already quite detailed (click the "SkullCrusher" image at the left to see its object movie for an example), so everything in between (you can use any number of snapshots) is good for normal use.
You also should try to keep the brightness of the pictures similar, or at least make sure that eventual differences between them are not immediately visible.
If you want to make an object with a 3D application, it's even easier: most of these programs (Dream 3D for example) allow easy rotation of the camera or object. The only thing you need to do, is rotate the camera or object each time by 360°/n (where n is the desired amount of pictures) and render the scene. Some programs will even do this automatically for you.

It's also quite easy to make a "multiple row" object movie by rotating (tilting) the camera or object in a vertical plane after taking the first set of photos, and then starting all over. (Mind that I say "rotate" and not "translate", because all the pictures must be taken from positions on a sphere — and not a cylinder — around the object.)
The cube at the right is an example of a multiple row movie (click the image to open the movie in a new window), it has 16 columns and 16 rows (256 views in total!) so you can view it from all possible positions. (It uses a fairly heavy Motion-JPEG B compression so it may look a bit blurred.)
Making the movie
Now you have your set of pictures, you only need to merge them into a viewable object movie. There are different ways to do this, but the cheapest (read: free) method is the following one. (Unfortunately, it only applies to Mac users.)
Create a new file in ResEdit (available for free at the Apple site), set its file type to "PICS" (with the "Get info for..." command) and paste all the pictures into it. Make sure that you do this in a logical order, i.e. start with the first one and end with the last one. The pictures will be stored in "PICT" resources with IDs of 128, 129 and so on.
If you don't plan to use the PICS file itself (for example in After Dark's PICS player), skip the next paragraph (gray text) because it will be unnecessary work.
Next, create a new resource (Command-K) of type "INFO". If everyting is right, you should get a window with "BWColor,Depth,Speed,...". If this is not the case, it's because you're missing the template for "INFO" resources. Don't worry, you can get it here (read the included "ReadMe" file for installation instructions).
Fill in the following values:
BWColor: 0 (I don't really know what this is good for)
Depth: The bit depth of the images. In most cases this will be 24, but if you should use 256-color images, use "8", and for B/W images, use "1".
Speed: This is the frame rate in frames per second.
Version: Not important
Creator: The Creator code of the source application (not important)
Largest frame in bytes: type the size of the largest PICT resource in here (tip: sort them by size, the largest one is at the bottom).
The PICS file is now ready and can be converted very easily to a QT movie: open the file in MoviePlayer. You'll get a "Save As..." dialog. Click "Options..." to change the settings for the movie. The only thing of importance is the compression. For a smooth colour movie, use "CinePak" compression, or if you have QT 3, use Sorenson if you're sure that your viewers have QT 3 too. In general, Sorenson delivers a smaller file with better quality, but this depends on the type of movie. The only disadvantage of Sorenson is that it can't be viewed in QuickTime below version 3. The "SkullCrusher" movie above uses Sorenson. It only takes 74K, while the CinePak version (which didn't even look as good) took 170K!
Another good compression is Photo-JPEG, but this one is not recommended for large pictures. It also doesn't make use of similarities between the different frames, as most other compression codecs do. A general rule for compression is: test out some different types with different settings and then choose the one that delivers the smallest file with a good image quality.
Making the Object movie
Now you have a plain QuickTime movie. The only thing that's left to be done now is converting it into an object movie. Just go to the QuickTime developers page and download the latest version of "QTVR Edit Object", it's free! Next, drag your movie onto this application. You'll get a window with a lot of parameters. The most important ones are Columns and Rows:
If your movie has only one row, just type the number of frames below "Columns" and type "1" below "Rows". Make sure to check "Wrap" with "Columns", unless your movie has a limited horizontal rotation (in that case you also need to specify the start and end values for the viewing angle). If your movie has multiple rows, fill in the right number below, and the correct values for the camera's "Tilt": the highest one for "Start" and the lowest one for "End" (if you made the pics in a 3D application, just use the numbers you used there). Again, if the movie has no limited vertical rotation, check "Wrap", otherwise don't.
Only in the case when your movie is viewable from all possible directions (360° X 360°), "Wrap" should be checked with both columns and rows, but 360X360 movies are rather rare, because 360X180 (this means: vertical rotation goes from -90° to 90°) is already sufficient to view the object from all sides. The other 360X180 part contains upside down views of the object, as you can see in the "cube" movie above. (The mathematical reason for this, is that a half circle already makes a full sphere when rotated over 360°.)
Now press "Apply" and test your movie. If you find that the direction of rotation is incorrect, check "Reverse Controls" and try again. You can also check "Auto-play views" to make the movie spin automatically.
That's it! It may look like a complicated process, but once you get the hang of it, you'll see that it ain't that hard. Have fun!